Importing through CSV in Advanced Parameters of PrestaShop 1.5
Shop owners will often already have data that they wish to use with their PrestaShop installation. Fortunately, there is a built in option for importing this data using Comma Separated Value (CSV) files. The following tutorial will show you how to use the import option which is in the Advanced Parameters section of the PrestaShop 1.5 administrator.
How to use the CSV Import Option in the Advanced Parameters in PrestaShop 1.5
- To get to the Performance section of the Advanced Parameters for Prestashop, first login to the Administrator as an Administrator
- Hover over menu bar where it says ADVANCED PARAMETERS - click on CSV IMPORT when it appears in the drop-down menu.
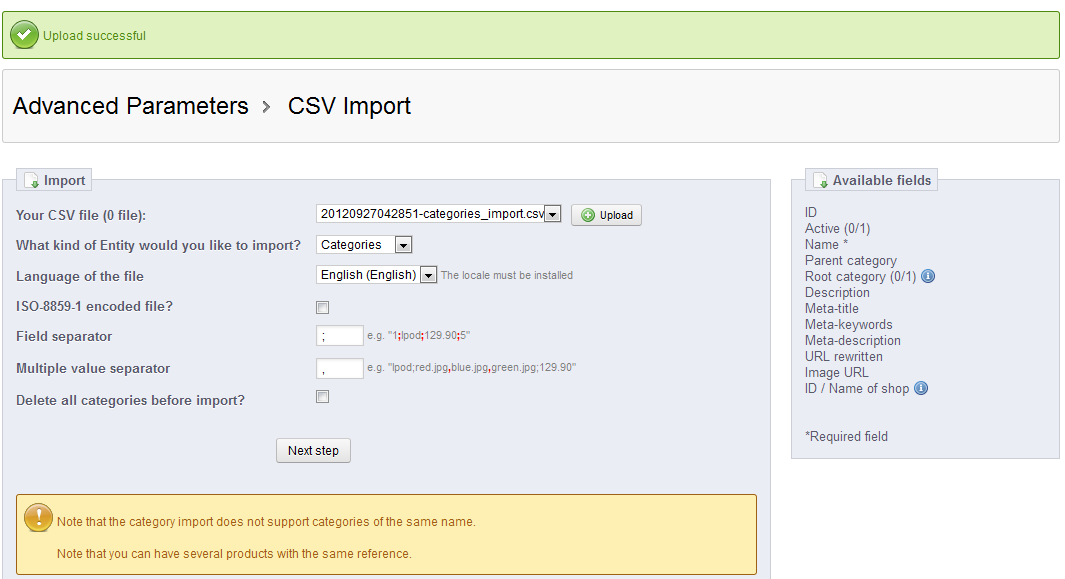
- You will see something similar to this screenshot:

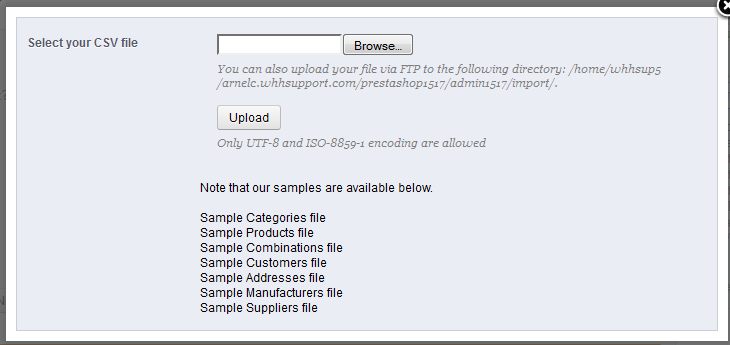
Before you can go to the next step you have to import a CSV file. Note that PrestaShop actually provides examples of the CSV files. Click on UPLOAD next to the field labeled Your CSV file (0 file):
Each of the samples above can be click on with your mouse. The CATEGORIES sample file was selected for this tutorial. Note that per the instructions above you can upload a specific type of file in a specific location. This information is summaried below:
- Upload the file via FTP to the path indicated under the BROWSE button above
- Upload either a UTF-8 or ISO-8859-1 encoded file
To see the Sample in action, simple click on one the listed Sample files, then click UPLOAD button to load the file. - The next section is labeled What kind of Entity would you like to import? This option gives you a drop-down menu with the following options:
CATEGORIES
CUSTOMERS
PRODUCTS
COMBINATIONS
CUSTOMERS
ADDRESSES
MANUFACTURERS
SUPPLIERS
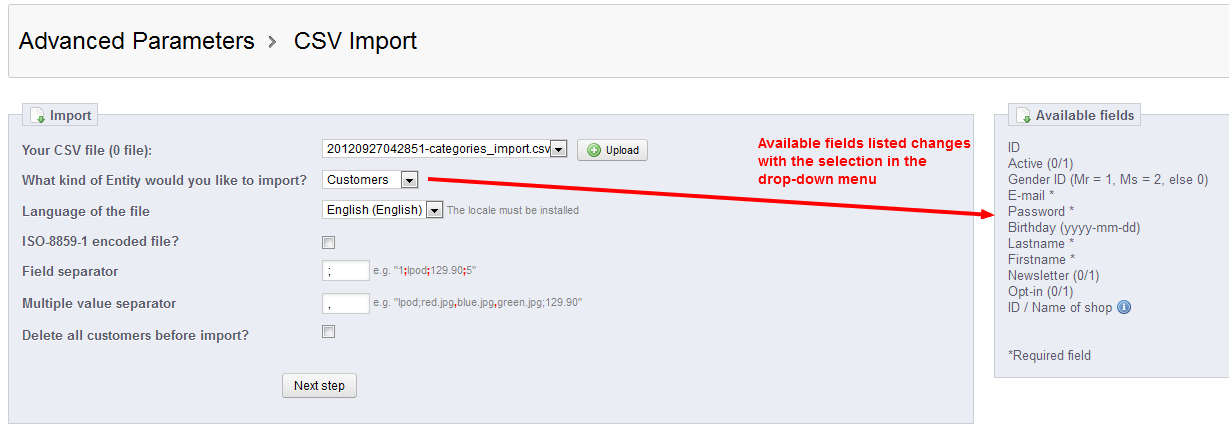
As the screenshot above indicates, the Available Fields to the right changes as you choose a different entity to import in the drop down menu. - Language of the file is the next option. It is selected by clicking on the drop-down menu. The instructional text indicates that the locale must be installed. This means that if the locale is not loaded that matches with the language that you are using, then you must go into LOCALIZATION and select the country to load (see How to Add Countries in PrestaShop 1.5).
Select the Language in the drop down menu and then move to the next item below. - This check box asks if you're using the ISO-8859-1 encoding. ISO-8859-1 is the default character set for most internet browsers. You can see a much more complete definition of this standard here:
W3Schools.com HTML ISO-8859-1 Reference
Select the check box if you are using this encoding. - The next two steps indicates the FIELD SEPARATOR and MULTIPLE VALUE SEPARATOR that you may be using in your CSV file.
Field Separator
Typically, you would think that the field separator in a CSV file would be a comma, but it can actually be a variety of characters. This option lets you designate the character used to separate the values. Click on the field and then type in the character used to separate the values in your import file.
Multiple Value Separator
Occasionally multiple values are grouped within a CSV, but they are separated with a secondary symbol such as a period or dash. The example below is copied from the screen:
Ipod; red.jpg, blue.jpg, green.jpg;129.90
This example gives you the category, and three image options separated by commas. This is the multiple value separator. If you do not have one, leave it blank, or use a character not being used by the main field separator. - The next category is the last option to select before you actually adjusting the values of your import to complete the process. This option is called DELETE ALL CATEGORIES BEFORE IMPORT? This option lets you decide if you wish to remove all of the categories that may already be saved in your database BEFORE you import a new set of data. Carefully consider if this is required and then click on the check box in order to enable it.
After this option has been selected there is a button at the bottom of the screen that says NEXT STEP and warning below it. Here's a screenshot:
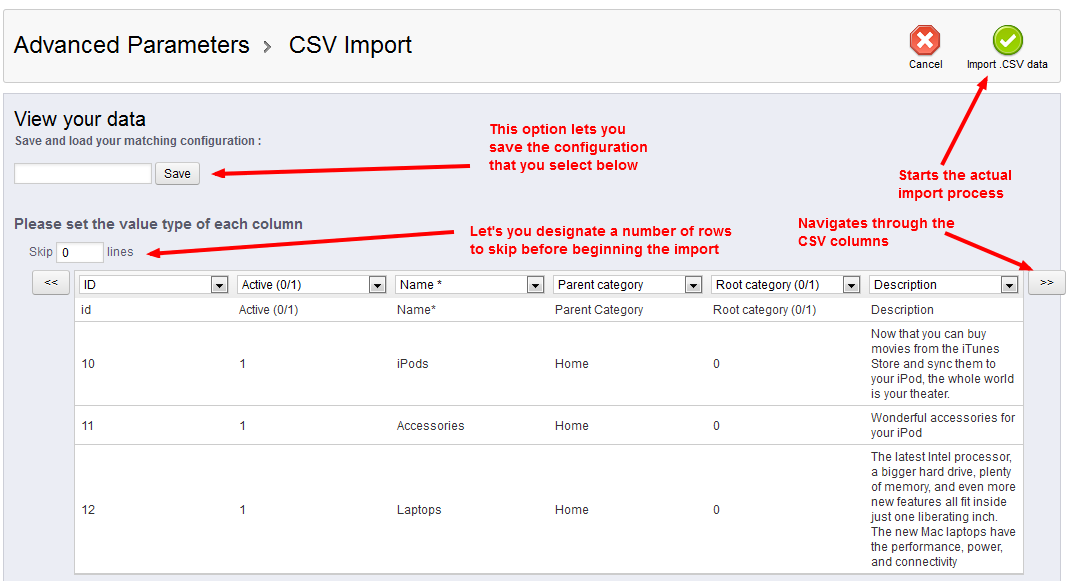
Before clicking on the NEXT STEP, please note the warning in the yellow box. CATEGORIES CANNOT BE THE SAME NAME. - Click on NEXT STEP to go to the final step before you import the data is to look at the data being imported and adjusting it to make sure that there are no problems before committing the import. Here's a screen that shows an example of what you may see:

Note the options that are labeled in the screenshot. Here's a summary list:
Save and load your matching configuration - option lets you save the configuration you designate for the file you are importing
Skip ## lines - option lets you skip a specific number of lines before importing
<< and >> - used to navigate back and for through the columns of the table
IMPORT CSV and CANCEL buttons - allows you to initiate the actual import of the data into your PrestaShop data
The main purpose of this screen is to adjust the value of each column so that it matches up with the field definitions of the PrestaShop table. Since the order of the values is most likely NOT the same as the PrestaShop table, you simply need to go to each column and select the drop-down field in order to select the matching value. Note that the NAME value has an * by it indicating that it is the primary field for the table. The values in the drop down menu will vary depending upon the entity you selected in Step 4. - Match the values, then select IMPORT CSV in order to complete the process. If needed, click on CANCEL to stop the import at any point.
Importing data is one of the most sought after features for e-commerce programs because the data for stores may often be coming from another application. Care should be taken with this feature in that it immediately affects your entire store in terms of the languages used, the format of the data placed in the database, and the size of the data. Take these factors into account when setting up your shop and optimizing for performance issues. The customer will see the effects of your imports primarily based on the imported content that you show in your store.

We value your feedback!
There is a step or detail missing from the instructions.
The information is incorrect or out-of-date.
It does not resolve the question/problem I have.
new! - Enter your name and email address above and we will post your feedback in the comments on this page!