How to Install Virtuemart in Joomla!
Virtuemart allows you to add E-commerce functionality to your Joomla! website. In this tutorial we will show you how to install Virtuemart in your Joomla website.
Before following this guide make sure you have already installed Joomla 2.5, it is available in Softaculous, which simplifies the installation process.
While Joomla 3.0 is available, at the time this article was written Virtuemart is compatible with Joomla! 2.5, 1.7, and 1.5.x.
What is Virtuemart?
Virtuemart is a free extension for Joomla! that essentally adds shopping cart functionality. Virtuemart is free and open-source which is great, since it is a fully featured E-commerce option for your website. It is written in PHP, and functions with a mySQL database backend.
Downloading Virtuemart:
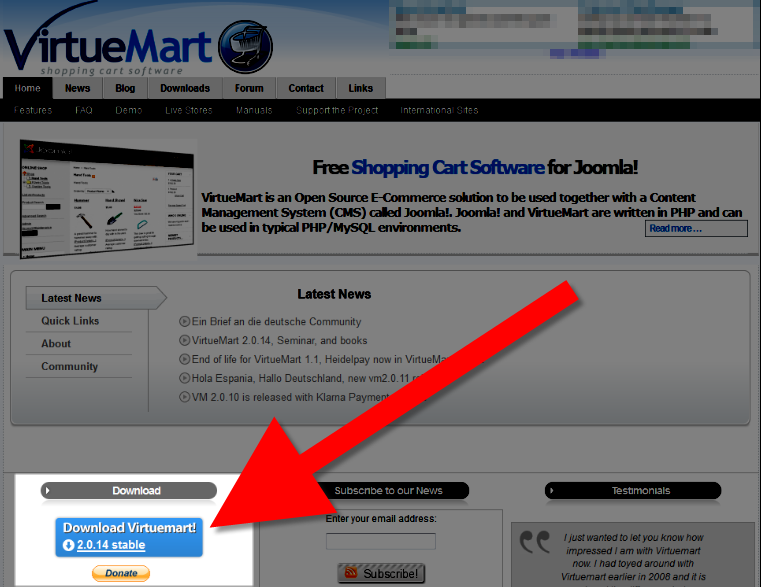
- Navigate to the official Virtuemart website.
- On the front page under the download menu, click the download link. At the time of this article the latest version stable version is 2.0.14

- You will see a download page that includes older versions and the latest stable version available. Click the latest version and download it to your computer. The file I downloaded was called:
com_virtuemart.2.0.14_extract_first
Installing Virtuemart
- Extract the file you just downloaded, there should be 2 zip files:
com_virtuemart.2.0.14 (install this one 1st, it contains the Virtuemart component)
&
com_virtuemart.2.0.14_ext_aio (install this one 2nd, it includes all the additional plugins and modules required to use the Virtuemart) - Login to your Joomla! Dashboard.
- Roll your mouse over the Extensions menu, and click Extension Manager option.
- Under the Upload Package File menu, click the Browse button, navigate to the first file (com_virtuemart.2.0.14), and click the Open button.
- Click the Upload & Install button to the right. This may take some time to complete.
You will see some information listed, and possibly a warning, we will address this in the next section. - Under the Upload Package File menu, click the Browse button again and navigate to the second file (com_virtuemart.2.0.14_ext_aio), and click the Open button.
- Click the Upload & Install button to the right. This may take some time to complete.
You will see a notification upon completion stating "Installing component was successful."
Updating the Log and Safe Paths:
- Using FTP or File Manager, navigate to the folder you installed Joomla in, and open the Logs folder.
- In the Logs folder, create a new file, and take note of the full path. In my tests I named it It should look something like this:
/home/user22/public_html/logs/safefile
- Roll your mouse over the Site menu, and select Global Configuration.
- Under the Global Configuration menu choose the System tab.
- Under the System Settings menu, in the Path to Log Folder enter the full path to the folder you created, then click the Save, or Save & Close button. You will see a message stating "Configuration successfully saved."
- Now, Roll your mouse over the Components button on top, and select VirtueMart.
- On the left menu, click the Configuration option, when it drops down, choose the new Configuration option on the list that appears.
- Click the Templates tab on top.
Next to the Safe Path field enter the path again.
As an example it should look like: /home/usern35/public_html/virtuemart/logs/safefile/ - Click the Save, or Save & close button on the top right.
You will see a notification stating:
Info: Corrected safe path added missing /
Info: Path for invoices createdConfiguration Saved
Congratulations, now you know how to install Virtuemart in your Joomla website!
After installing VirtueMart, you probably will see a few errors, such as no shop currency defined! These are actually normal, and we'll cover them in our next tutorial.
Help Center Login
VirtueMart Installation and Login
| 1. | How to Install Virtuemart in Joomla! |
| 2. | No Shop Currency defined! - VirtueMart Error |
| 3. | How to Assign the VirtueMart Component to a Menu Item |
| 4. | How to Update VirtueMart |

We value your feedback!
There is a step or detail missing from the instructions.
The information is incorrect or out-of-date.
It does not resolve the question/problem I have.
new! - Enter your name and email address above and we will post your feedback in the comments on this page!