Using the Backoffice for a Product Sale in PrestaShop 1.5
An administrator or employee with the appropriate access to the PrestaShop backoffice can make a sale using the provided interface. The following tutorial will show how to enter the sale of product with the administration dashboard in Prestashop 1.5.
Using the Order Interface to Create a Sale in PrestaShop 1.5
- Login to the Administrator Dashboard as an Administrator
- Go to the menu bar and hover over ORDERS, then click on the first item that appears in the drop-down menu which will be ORDERS. You will see the following screen (or something similar):

The ORDERS interface is used to manage or view existing orders. If you wish for more information on this interface, please see Viewing Orders in Prestashop 1.5.
The screenshot above shows the MULTISHOP configuration. In order to see the ADD NEW button to the ORDER list, you will need to select a specific shop. Click on the drop down arrow of the Multishop configuration field to select a specific shop. Once the shop is chosen, you will see ONLY the sales specific to that shop. Click on the ADD NEW button in order to proceed. - The ADD NEW button will bring up the following screen:

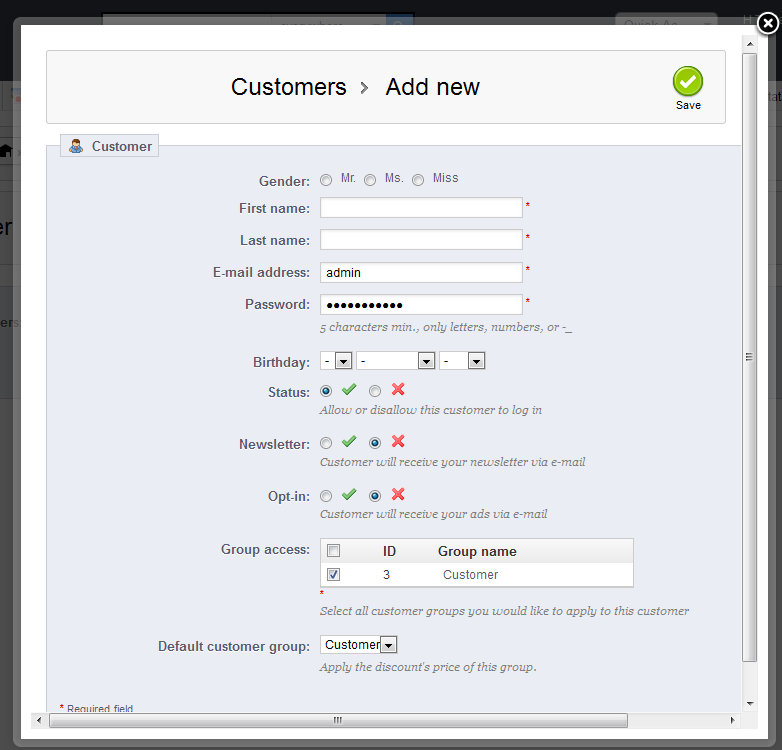
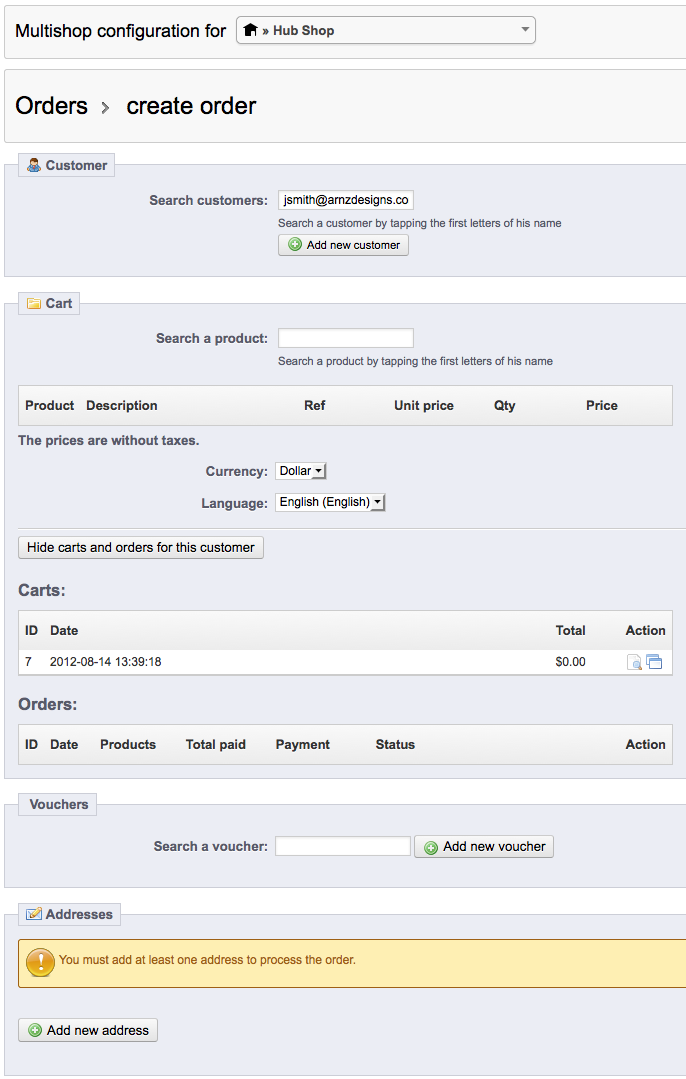
Start typing the customer's last name and if they are a former customer then the nam will appear. If not, you will need to click on ADD A NEW CUSTOMER. - If you are using an existing customer, you will see their history appear when you select their name. If you select ADD NEW CUSTOMER, you will see the following:

The fields shown here are identical to adding a new customer through backoffice or for a customer logging in through the store front. For more information on these fields, go to Adding Customers to PrestaShop 1.5. Make sure that all of the information is accurate and then select the SAVE button in the top right hand corner of the screen. - After the customer is saved you will briefly see the customer list for the shop then the screen will revert to the following display for creating an order:

In the CART area, click in the blank field beside SEARCH A PRODUCT, and start typing the name of the product from the store. Once the appropriate product appears, then make sure you have the correct quantity of items (in the next field down), and then select ADD TO CART. - After you have verified the product or products in the order, you will see a listing of the carts. Verify the information is correct. The total on the latest cart will be $0. Skip to the next section which is labeled VOUCHERS. Add a voucher as necessary.
- Double check the addresses used and make changes or add a new address as necessary.
- Make sure Shipping options are set correctly then review the SUMMARY of the order at the bottom. You will be able to send an order message here, determine a payment type and also setup an order status. When you have completed these items, click on CREATE THE ORDER, and you will have completed the sale process within the PrestaShop Backoffice.
The option to use the backoffice for making a sale has been a customer-driven request. Customers may often call or meet in person with the shop owner and an interface was required in order to allow the administrator/store employee to add the sale. The following screenshot shows the SUMMARY section of the interface as well as the CREATE THE ORDER button that commits the product sale:
Did you find this article helpful?
Tweet
Category
Keeping your Email Organized
Help Center Login
Keeping your Email Organized
Related Questions
Here are a few questions related to this article that our customers have asked:
Ooops! It looks like there are no questions about this page.
Would you like to ask a question about this page? If so, click the button below!

We value your feedback!
There is a step or detail missing from the instructions.
The information is incorrect or out-of-date.
It does not resolve the question/problem I have.
new! - Enter your name and email address above and we will post your feedback in the comments on this page!