Managing Dashboards in Modx
When you first look at the Modx backend interface, you will see what Modx refers to as a "dashboard." Each Dashboard can be modified to look a particular way and contain different functions based on widgets. The following article will explain how to create, modify, duplicate and delete a dashboard within the Modx backend.
Creating a Dashboard
- Login to the Modx Backend Administrator
- When you login, you will first see the dashboard that your default user is assigned to. Here's an example of what you would see:
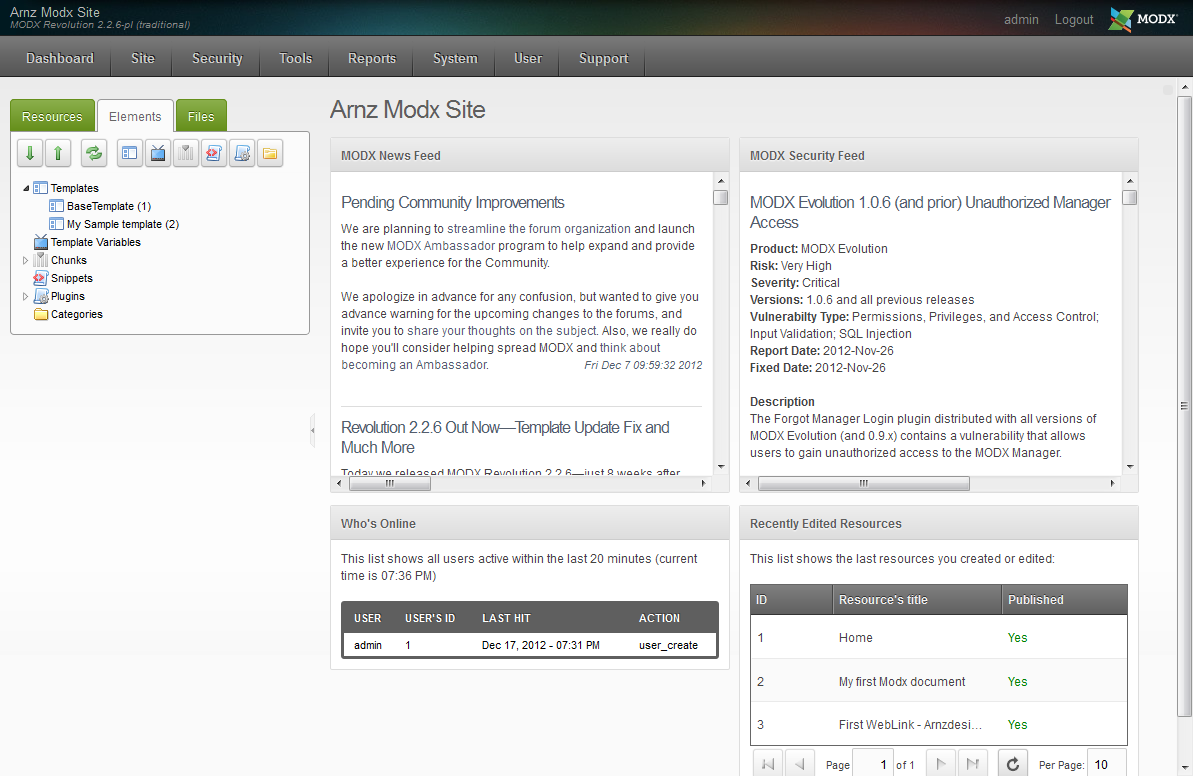
What you are seeing on the screen are the different Widgets and settings that the dashboard is configured to display. Each widget is labeled in its individual box: MODX News Feed, MODX Security Feed, Who's Online, Recently Edited Resources. You can also choose to display the Resources at the left. In order to Create or Edit Dashboards, click on Dashboards in the upper left corner and then click on DASHBOARDS when it appears in the drop-down menu. It will appear as below: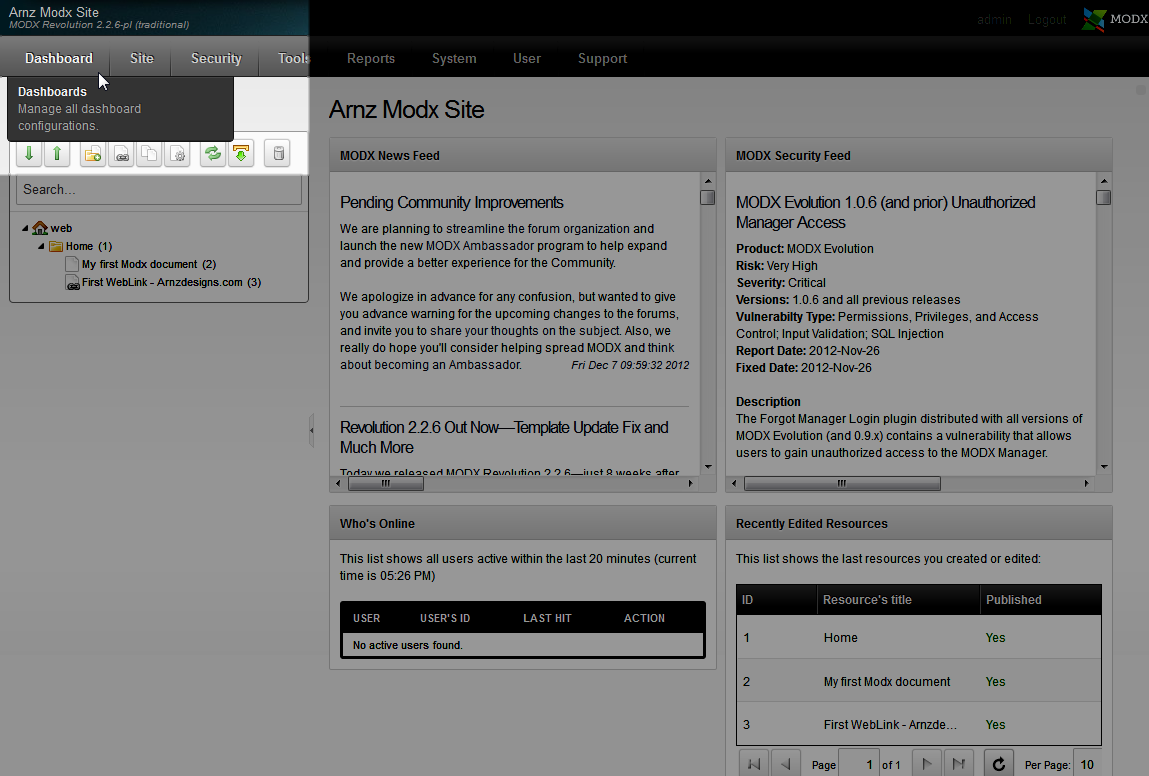
- You will see the list of the created dashboards at the right. It should appears as follows:
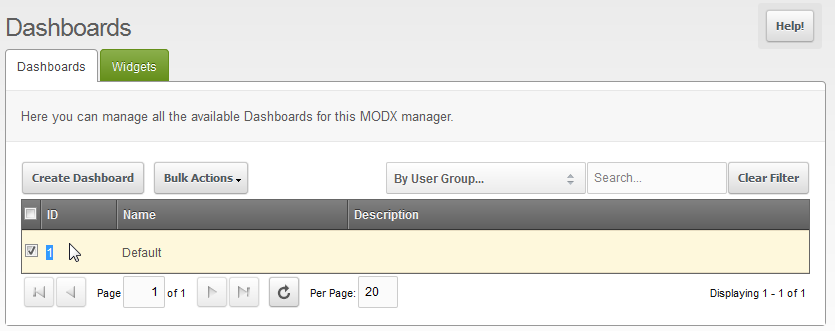
In order to create a new dashboard start by clicking on the CREATE DASHBOARD button in the lefthand side of the screen as per the screenshot above. You will see a blank screen with several fields that you can select and fill: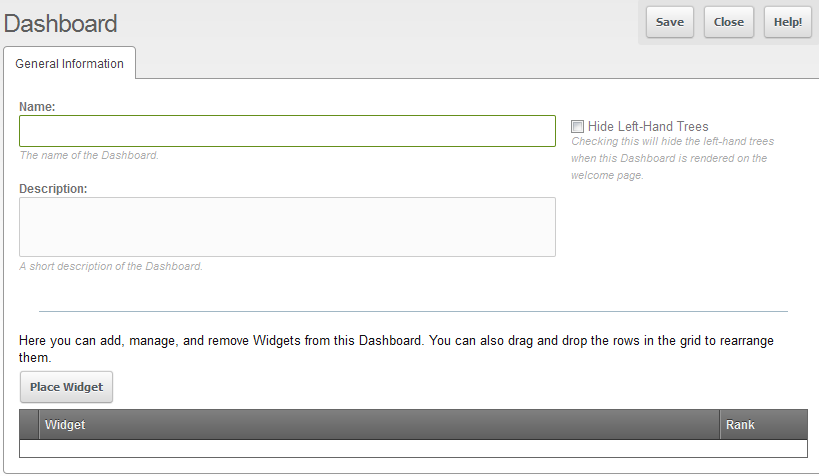
- When you create a new dashboard, it is basically creating a new view for a group users - access dashboards are controlled in the User Group settings. See Creating User Groups in Modx for further information. Click in the Name field and give the dashboard a name.
- Next, click in the DESCRIPTION to add a short descriptioin of the dashboard that you creating.
- The next step involves deciding what will appear when the user logs into the Dashboard that you are creating. This is done by deciding on whether or not to display the resource files at left (using the checkbox at top right) and then clicking on PLACE WIDGET in order to determine which section will be appearing. Here's what Modx will show with the default widgets installed:
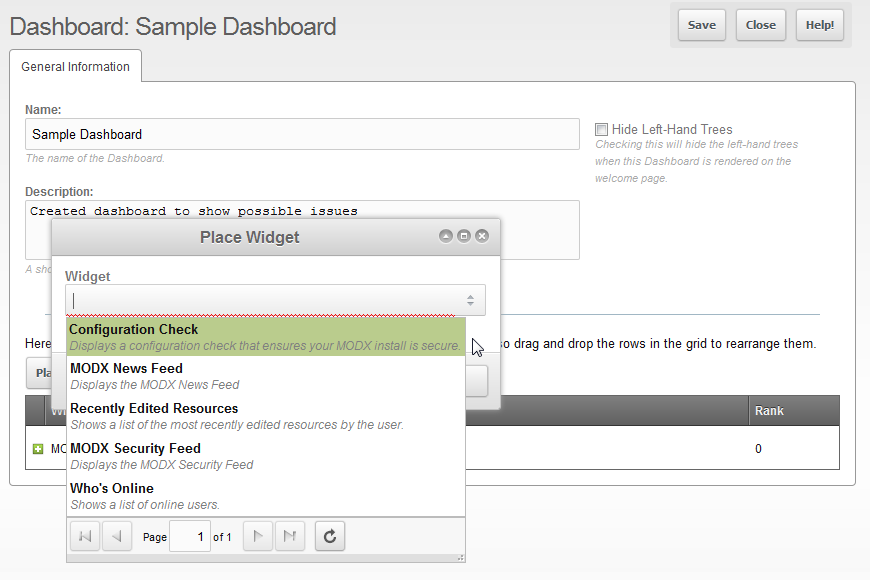
Select the Widgets that you wish to use with this dashboard. The screenshot at the beginning of this article shows all of the listed widgets being displayed. - Select SAVE in the top righthand corner in order to save the dashboard that you have created.
Editing a Dashboard
Editing dashboards can often occur when you need to add or remove some functionality or data from appearing for a specific dashboard. The edit function is actually labeled as UPDATE DASHBOARD and is not immediately obvious. It will require that you use the right-click option on your mouse. Here's a summary of the steps:
- Login to the Modx Backend
- Click on DASHBOARDS in the lefthand corner and the click on DASHBOARD again when it appears in the drop-down menu
- You will see a list of the dashboards that you have created. In order to EDIT the dashboard, you will need to right-click with your mouse on the DASHBOARD in the list. You will then see a menu that shows the following:
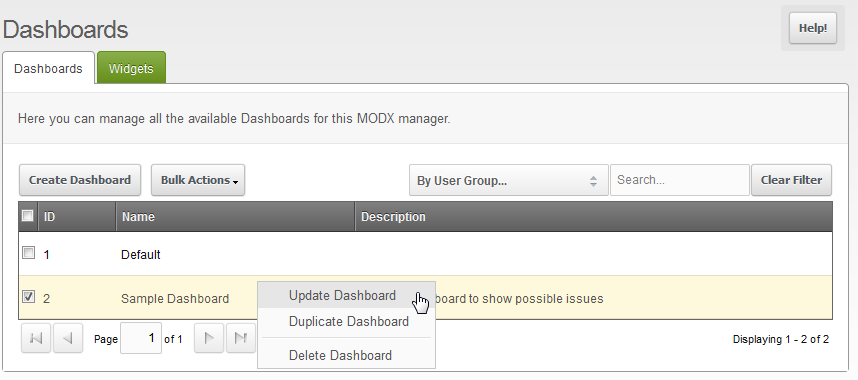
Notice the options that show in the menu that appear: UPDATE DASHBOARD, DUPLICATE DASHBOARD, DELETE DASHBOARD. Select UPDATE DASHBOARD in order to edit dashboard. - When you are editing the dashboard, you will see a screen similar to creating the dashboard, but this time there will be existing values:
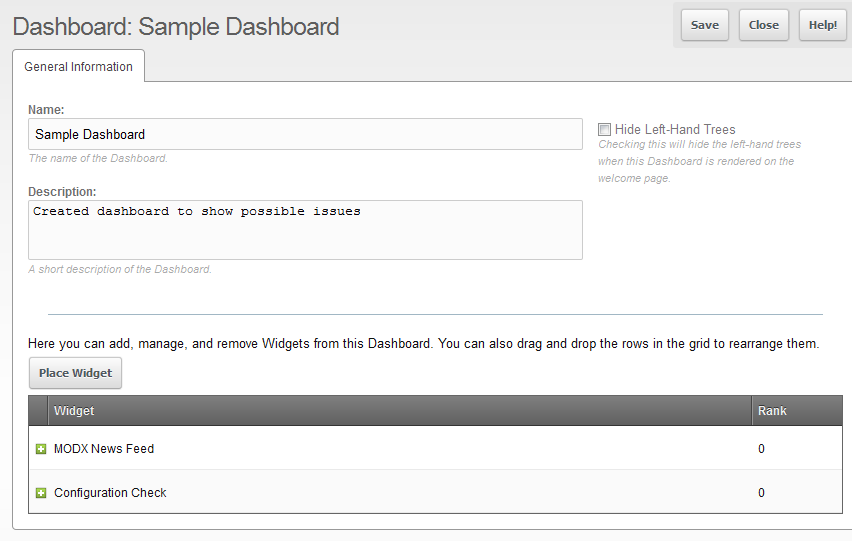
The dashboard shown above shows the name, description, and 2 widgets that have been assigned. Additionally, the files to the left that show the resources are not hidden. You can choose to edit any of the fields, hide the files (resources), or place a widget in order modify the widget. - Once you have made your changes, click on SAVE in the upper right hand corner to save the widget with your changes.
- You also have the option to edit the dashboard name and description while looking at the list of dashboards. Double-click on the Name or Description of the dashboard in order to edit and you will see the following:
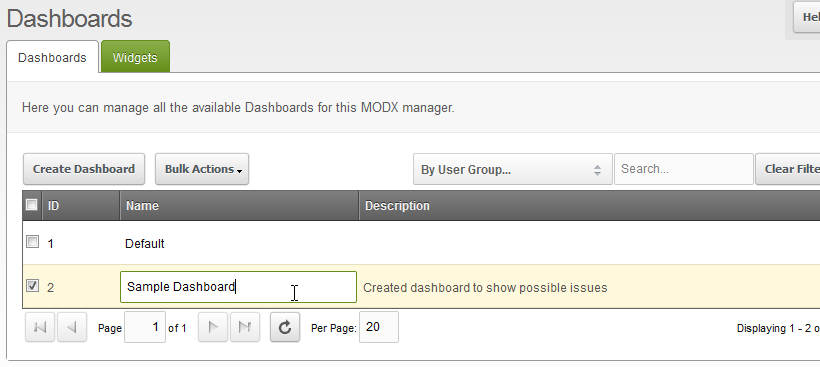
Note that when you make the changes and click on the ENTER key on your keyboard, the changes are automatically saved to the server. Double-click on name or description to make additional changes.
Duplicating Dashboards
Duplicating dashboards can come in handy if you have a dashboard with a large amount of functionality that you want to assign to a particular user group but with a few changes. Duplicating a dashboard uses the same steps as deleting or editing them. Here's a summary of the steps:
- Login to the Modx Backend
- Click on DASHBOARDS in the lefthand corner and the click on DASHBOARD again when it appears in the drop-down menu
- You will see a list of the dashboards that you have created. In order to DUPLICATE the dashboard, you will need to right-click with your mouse on the DASHBOARD in the list. You will then see a menu that shows the following:
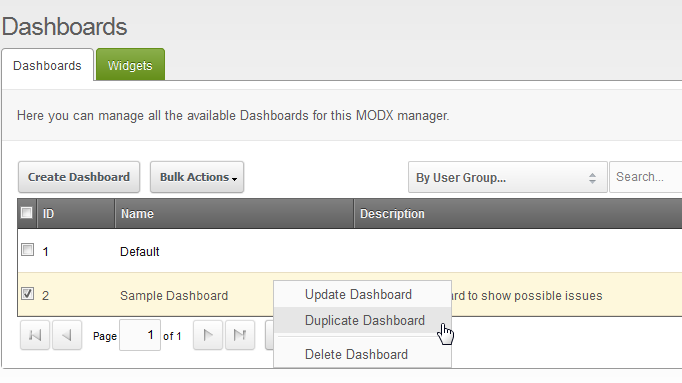
Click on DUPLICATE DASHBOARD and then you will see the duplicate appear named "Duplicate of..." and the name of the dashboard you have duplicated. Double-click on the name to change it, if you wish. - Right-click and select UPDATE DASHBOARD on the duplicate dashboard in order to edit and make any necessary changes.
- When you have completed making your changes, click on SAVE in the top righthand corner in to save your entries.
Deleting a Dashboard
Occasionally, you will need to remove a dashboard. This is easily done using the delete function. The DELETE function for the dashboard area can be reached two different ways. You can use the Bulk Actions menu, or you can right-click on the specific dashboard you wish to delete. Here are a summary of steps for both methods:
Deleting Dashboard by Righ-clicking on the Dashboard
- Login to the Modx Backend
- Click on DASHBOARDS in the lefthand corner and the click on DASHBOARD again when it appears in the drop-down menu
- You will see a list of the dashboards that you have created. In order to DELETE the dashboard, you will need to right-click with your mouse on the DASHBOARD in the list. You will then see a menu that shows the following:
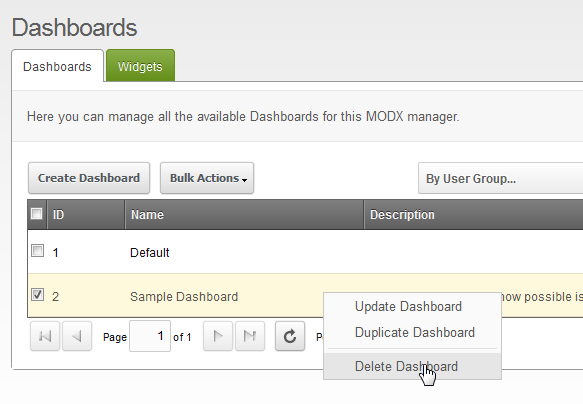
Click on DELETE DASHBOARD in order to delete the dashboard (you do not need to click on the checkbox as indicated in the screenshot above). - You will receive a confirmation screen that appears as follows:
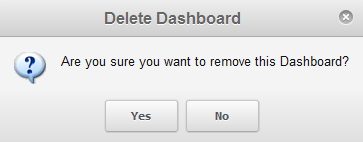
Select YES in order to delete the dashboard.
Deleting Dashboard by using the Bulk Actions Menu
- Login to the Modx Backend
- Click on DASHBOARDS in the lefthand corner and the click on DASHBOARD again when it appears in the drop-down menu
- You will see a list of the dashboards that you have created. In order to DELETE the dashboard, you will need to select the specfic dashboard by clicking in the checkbox to the left of the dashboard. It will appear as follows:
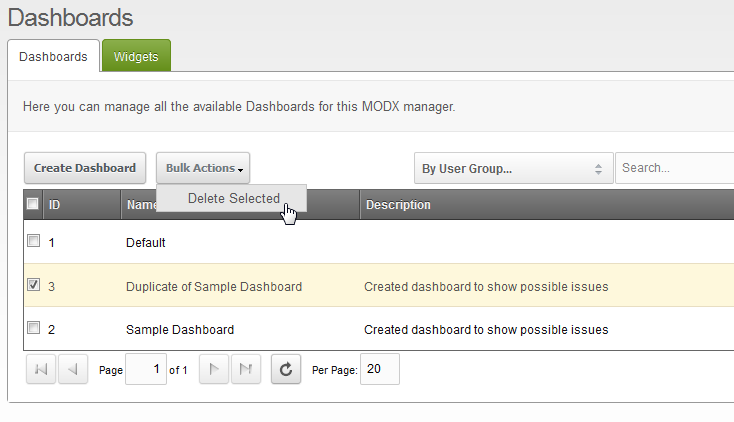
Next, click on BULK ACTIONS and you will notice that the only action you can take is the DELETE SELECTED option. Click on it to delete the dashboard or dashboards you have selected. - You will then see a confirmation dialog. Click on YES in order to confirm that you are deleting the dashboards you have selected.
As your website grows in complexity, Modx scales to meet these needs by providing the ability to provide different interfaces for the variety of users who may be accessing your website. Using the dashboards helps to manage how your backend users will meet the management needs of your website. With the addition of user groups, you can easily assign the proper access and functionality of your users while keeping the interface simple and clean with custom dashboards.

We value your feedback!
There is a step or detail missing from the instructions.
The information is incorrect or out-of-date.
It does not resolve the question/problem I have.
new! - Enter your name and email address above and we will post your feedback in the comments on this page!