Setting Taxes in PrestaShop 1.5
Quite often taxes are required for sales of your goods within a specific region. These taxes may also apply depending on region to which your goods are being delivered. PrestaShop pre-defines much of these tax rates making it simply a task of assigning these taxes. In PrestaShop, taxes are first defined and then used in a Tax Rule. The Tax rule applies the Tax depending on the region The following tutorial shows you how to set taxes as defined by PrestaShop 1.5. For more information on adding a new tax rate for a region, go to Adding New Taxes in Prestashop 1.5.
Determining the Taxes Used in PrestaShop 1.5
- Log in to the Administrator Panel as an Administrator
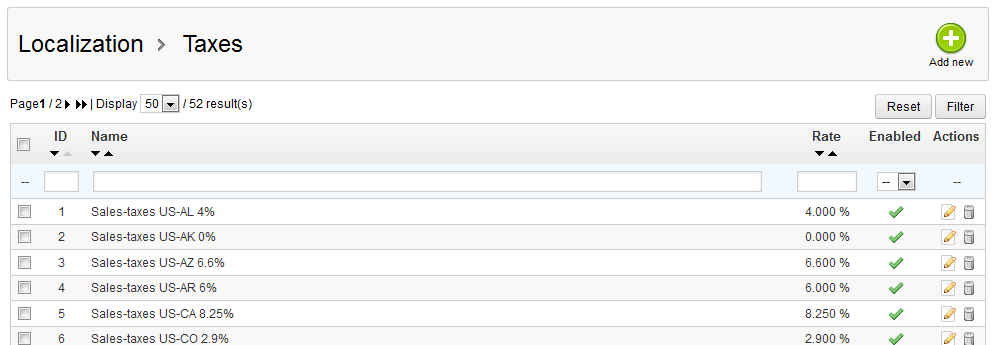
- Put your mouse on the menu bar and then click on LOCALIZATION. When the drop down menu appears, click on TAXES. You will see something similar to the following:

- The TAXES section starts off with a green ADD NEW button in the top right hand corner. On the next line below it, is the filtering options. These alow you determine the number results that you display at once. The RESET button to the right clears these settings, while the FILTER button applies the changes to the results being displayed.
The following table defines all of the columns in the table above:
ID ID is the numeric value for each tax assigned by Prestashop Name Name of the Tax based on the region name Rate Tax rate assigned Enabled Identifies if tax is active Actions Identifies the edit and delete options
Below the table of taxes there are also the following buttons:
DELETE SELECTED - deletes the tax that you have selected
ENABLE SELECTION - enables the tax that you have selected
DISABLE SELECTION - disables the tax that you have selected - To select a TAX, click on the checkbox for a tax displayed in the table. In order for the tax to be assignable, the tax must be active. Click ENABLE SELECTION to enable the tax definition if it is disabled. Note that all of the taxes listed here are simply the tax rate definitions per region. These tax rates or rules are applied per the product and per the sale.
- Click on SAVE in the upper right hand corner to save your tax definition.
Understanding how to add the tax definitions is a relatively simple matter. When it is complete, there should be a green checkmark to the right of your definition indicating it is active. The screenshot used above shows exactly how it will look when the tax is set

We value your feedback!
There is a step or detail missing from the instructions.
The information is incorrect or out-of-date.
It does not resolve the question/problem I have.
new! - Enter your name and email address above and we will post your feedback in the comments on this page!