Becoming Familiar with the Contao Back end
When you first login to the Contao Backend Manager, you immediately see that they organize the screen into three distinct areas: a top menu bar, a left hand menu bar (labeled "Back end modules"), and middle window that displays data depending the section you select. Each section has a different purpose and helps you navigate the different areas of Contao's interface. The following article describes the different areas that you will see and also explain the different views you will encounter as you display data in the Contao Back end.
Describing the Contao Back end Manager
When Your First Login to the Contao Back end
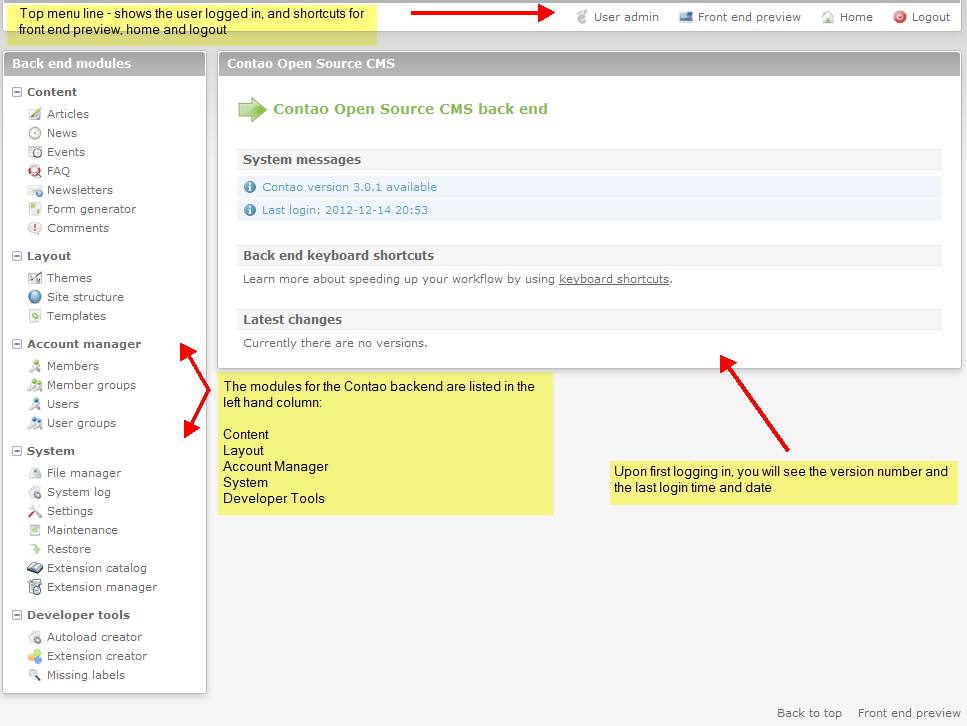
Upon logging into the Contao Back end Manager you will see the following:
Each section is described in the illustration above. You can also take your mouse and hover over the text in each area in the Contao back end. The text will change color and also bring up a description of the text in relationship to the area you are viewing. The data section in the middle right of the screen will show the version of Contao that is loaded as well the date and time of your login. It will also list the Keyboard shortcuts and any changes that may have been recently made to the CMS. Here's a summary of the highlighted areas for both the top menu and the back end modules:
| Top Menu Bar | |
|---|---|
| User | Name of the User logged in |
| Front End Preview | Web site created with Contao |
| Home | Returns to the Back end Start page |
| Logout | Exit the Back end |
| Back End Modules | |
|---|---|
| Content | Articles, News, Events, FAQ, Newsletters, Form Generator and Comments - content of the website being created and managed with Contao |
| Layout | Themes, Site structure, Templates - design elements for the website created by Contao |
| Account Manager | Members (Front end users), member groups, Users (backend users), and user groups |
| System | File manager, System log, Settings, Maintenance, Restore, Extensions catalog, Extension manager - system items for managing files and Contao settings |
| Developer tools | Autoload creator, Extension creator, Missing labels - developer section for extending and creating items for contao |
The screenshot above also includes two links in the bottom right hand corner: Back to the top and Front End preview. The first link jumps you back up to the top of the interface and the Front End preview will open a separate window with the current view of the website created by Contao.
Understanding the Views
Top Menu Line
As noted above, the middle portion shows a different screen per the item that you select in each menu section. Starting with the Top menu, clicking on the User will lead to the screen to update personal data and the password for the user. This is the only selection in the top menu that will change the middle screen for the user while remaining in the backend. The logout option closes the back end and re-displays the login dialog. The home button returns the user to the beginning screen of the backend.
Back end Modules
The back end modules shows 3 different types of views depending on your selection within the menu:
- List view - will generate a list based on the letter of the item being listed
- Parent view - shows a detailed portion of the document that you select to display
- Tree view - gives a tree view that can be expanded or collapsed to show data
Note that the top menu bar and the back end modules list on left do not change. The screenshots below illustrate the different views per the list above.
Here are examples of each view:
LIST VIEW
TREE VIEW
Becoming familiar with the views will help you feel more comfortable with using the Contao interface. It helps you to quickly navigate to the necessary item that you may have to edit or manage. Each section of the back end interface has a different purpose, but as you learn how to use Contao, the navigation tasks become simpler and you begin to appreciate both its simplicity and efficiency for getting the job done.
To continue with learning the Contao interface, click on the Quick Start Guide to Website Creation in Contao.


We value your feedback!
There is a step or detail missing from the instructions.
The information is incorrect or out-of-date.
It does not resolve the question/problem I have.
new! - Enter your name and email address above and we will post your feedback in the comments on this page!