Quick start to Creating a Page in Contao
In this tutorial, we are going to show you how to create a new page within your Contao site. There are many settings and options available, but for the purpose of keeping this as simple as possible, this tutorial is only going to show you the essential points.
How to Add a Page in Contao
- Login to the Contao back end interface
- In the Back end modules on the left, scroll down until you see SITE STRUCTURE in the Layout section. You will see the site structure in a tree-style view.
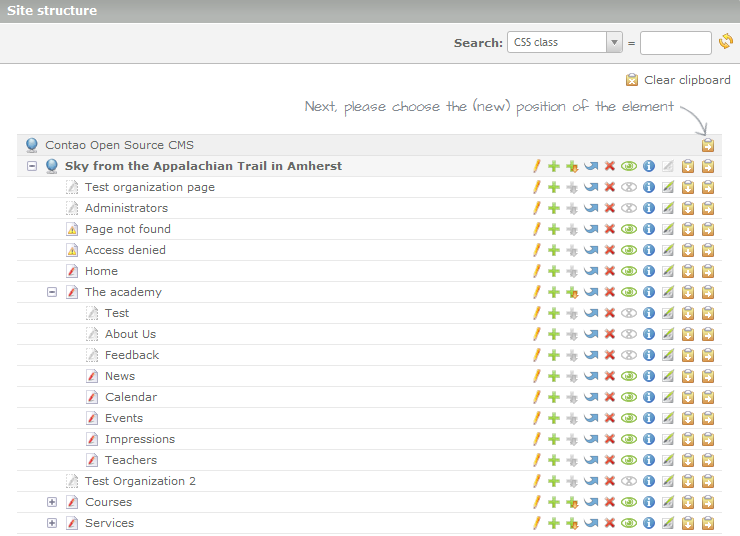
- Towards the top right of the page, click "New page". You will then be presented with the items in the site structure in a tree-style view once again. You will need to position your new page in the structure. Here's an example what you may see:

Note the instructions above: "please choose position of the element...". You will need to click on the icon on the far right resembling a clipboard. Here's a quick table summarizing what each clipboard icon type does:

Paste after the selected item. Positions your page under the selected menu item but not within the group or sub-group 
Paste into the selection item. Positions your page under the selected menu item and within the group or sub-group
All items have a parent item. For example, "News" is found under its parent, "The academy" in the screenshot above. Determine what you would like to be the parent of your new page, and then click the clipboard icon (the one with the arrow pointing to the right) to the right of the parent. In our testing, we are adding an "Our Services" page that will be found within "The academy", so we are clicking the clipboard icon next to "The academy".
There are many details on this page, as a reminder, we are going to highlight only the essential details.
Position your new page, then enter the desired paged name. For example, in the screenshot above, you can see a page that we created called "Test". - Scroll down the options for the new page and make sure to check off PUBLISH PAGE.
- Click "Save and close" at the bottom of the page.
- At this point, our new page is created and we now need to add content to the page. Return to the main menu for the Contao Back end (as if you had just logged in again), and in the Back End modules section, scroll down until you find ARTICLES. Click on ARTICLES to proceed.
- In the list of items on the page, find the page you just created (in our testing, we are looking for "Test". You will see the page name listed twice. Next to the second instance of the page name, click the pencil icon to edit the article. The item and the pencil icon are highlighted below to clarify what you are trying to find:

- You will next be adding the actual content (referred as an "element" by Contao). Click the "New element" link at the top of the page.
- Once again, there are many options for new content, and at this time we are only going to cover the basics. In the drop-down menu, leave the Element Type as "Text". The third area (the text editor) on the page says "Text". Within this editor, type the content for your new page. In our testing, as the page is called "Test", you can any text in order to simply create a test page.
- Click on a SAVE option at the bottom of the page.
Congratulations! At this point, you should have successfully created a new page within your Contao website. Visit your site, and you should see this new page within your menu. For further detail on creating both the article ID and article content, go to Creating the Article Id in Contao, Creating New Content Elements in the Contao Back End.
Did you find this article helpful?
Tweet
Category
Getting Started with Contao
Help Center Login
Getting Started with Contao
Related Questions
Here are a few questions related to this article that our customers have asked:
Ooops! It looks like there are no questions about this page.
Would you like to ask a question about this page? If so, click the button below!

We value your feedback!
There is a step or detail missing from the instructions.
The information is incorrect or out-of-date.
It does not resolve the question/problem I have.
new! - Enter your name and email address above and we will post your feedback in the comments on this page!