Defining Products for Cart Rules in PrestaShop 1.5
Cart rules -which are vouchers or coupons - can be specifically assigned to a product in your inventory. To do this, you will use the cart rule condition labeled PRODUCT SELECTION. The cart rule condition for product selection lets you choose a product based on attributes, categories, manufacturers, and suppliers. The following tutorial shows how to use the product selection cart rule condition in PrestaShop 1.5.
Choosing A Product for Cart Rules in PrestaShop 1.5
- Login to the Administrator Dashboard as an Administrator
- Go to the menu bar and hover over PRICE RULES. Click on CART RULES when the drop-down menu appears. You will see a screen similar to the following:

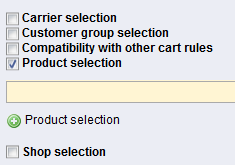
As depicted in the top right hand corner of the screenshot above, click on the ADD NEW button in order to create a new cart rule. You can also click on an existing cart rule from the list. When the new rule or existing rule opens, look to the left and select CONDITIONS in order to open the CART RULE CONDITIONS tab. Scroll down to the bottom of the screen until you see PRODUCT SELECTION. - As per the screenshot below, click on the check box beside PRODUCT SELECTION. Click on the green icon ( with the plus sign) labeled PRODUCT SELECTION to start defining the product for your cart rule.

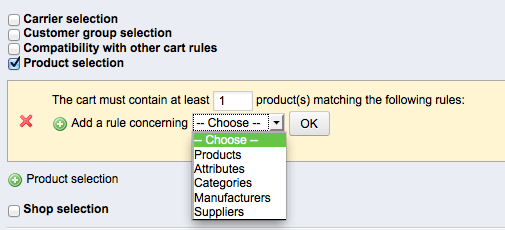
- The first step is to set the number of products that must be matched before the cart rule applies. As per the screenshot below, the default is set to '1'. You can change this to any number by simply clicking in the field and putting in the number of products you need for your cart rule.

- The next step involves specifying the actual product based on its attributes, categories, or manufacturers. Click on the green plus button that is labeled "ADD A RULE CONCERNING" and then there will be a drop-down menu that is labeled "Choose". When you click on the drop-down menu you will see: Products, Attributes, Categories, Manufacturers, or Suppliers.
- Select an option from the drop-down menu, then click on the OK button and you will see a screen similar tot he following:

Note that you will get another line labeled with the option you selected in the drop-down menu. For example, in the screenshot above, ATTRIBUTES was chosen in the drop-down menu. The condition created is then labeled with the word "[Attributes]". Beside the line you will see an icon of an open book with the word CHOOSE labeled beside it. Click on CHOOSE, and you will see something similar to the following:
- Click on an item in the left column (UNSELECTED column) and click on ADD in order to move it to the SELECTED column. Or, Click on an item in the right column (SELECTED column) and click on REMOVE in order to move the item into to the UNSELECTED group.
- Once you have completed the process of selecting the item click on the 'X' in the top right corner to close this selection window. This completes this portion of the PRODUCT SELECTION condition. Note that at any point for a condition you have created, you will see a RED 'X'. Click on the RED 'X' in order to remove the condition.
- When you have finished adding or editing all of the PRODUCT SELECTION conditions, then go to the top right hand portion of the screen and click on the SAVE option to save your entries.
Product Selection conditions allows you to specify a product based on its attributes, categories, manufactures or suppliers. This allows you to be very specific about which product will be affected by the cart rule. Remember to carefully assign this option to your cart rule(s) so as to properly assign discount values to the product or products you have specified.
The next cart rule condition concerns the shop affected by the rule. For further information please go to Choosing the Shop for Cart Rules in PrestaShop 1.5.

We value your feedback!
There is a step or detail missing from the instructions.
The information is incorrect or out-of-date.
It does not resolve the question/problem I have.
new! - Enter your name and email address above and we will post your feedback in the comments on this page!