Configuring the MailChimp Module for PrestaShop Newsletters
In our previous tutorial, we walked through the steps of downloading and installing the MailChimp for PrestaShop module. The next part of the process is to input some configuration settings so that the module can communicate with your MailChimp account. This tutorial will guide you through these settings so you can begin using the MailChimp module to send Newsletters or other email campaigns right from your PrestaShop back office.
- In the PrestaShop back office, you should already be on the MailChimp for PrestaShop module configuration page (Modules > MailChimp for PrestaShop > Configure).
- On the MailChimp for PrestaShop configuration page, you will see fields for the MailChimp ApiKey.
- This API can be found in our MailChimp account. Open a new tab or browser window and log into your MailChimp account.
- On the MailChimp menu, go to Account, then select API Keys & Authorized Apps.
- To create a new API Key, click the Add A Key button.
- In case you add additional API keys in the future, it's a good idea to go ahead and add a label to the API so you know what it's being used for.
- Copy your new API key from MailChimp, so that you can paste it into the MailChimp module in PrestaShop.
- Switch back to the MailChimp configuration page in PrestaShop and paste your new API key into the field provided.
- In the Test Email field, type in your email address for sending test campaigns/newsletters to for review before sending to your entire subscriber list.
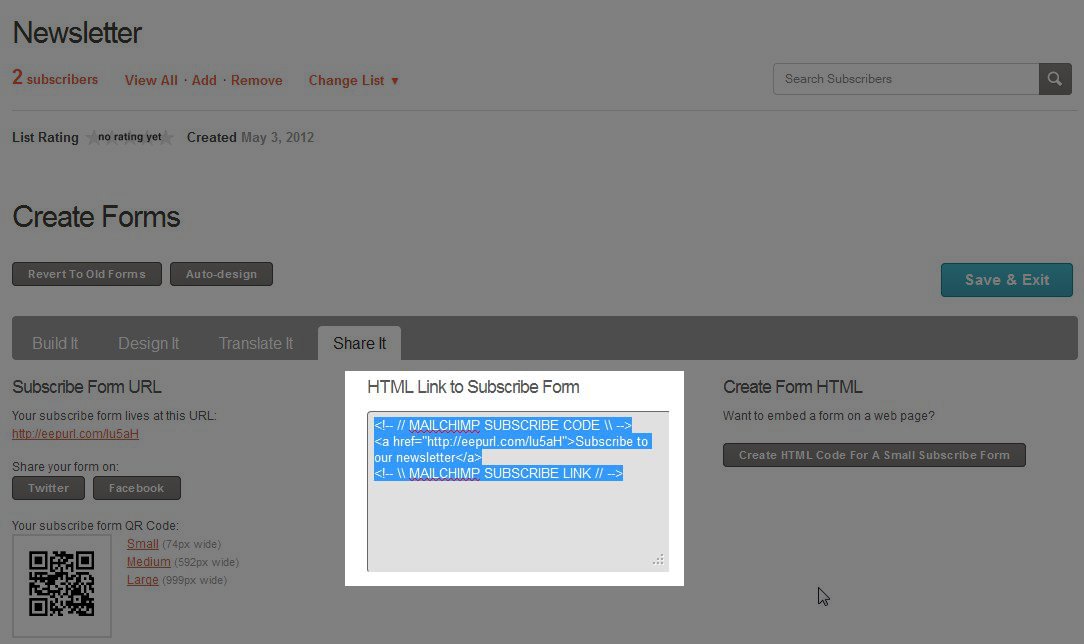
- The MailChimp for PrestaShop module will allow you to input code from MailChimp to display your subscription form in the left or right column of your PrestaShop site. Unfortunately, most forms will not display correctly in such a narrow space. It's a better practice to place that form on a separate CMS page or simply provide a link to your subscribe form instead. Make sure you've created a sign up form in MailChimp and on the Share It tab, copy the code in the HTML Link to Subscribe Form field.
- Switch back over to your PrestaShop back office and paste the link into the Newsletter Form Code area of the MailChimp module configuration page. I added a line break tag <br /> before my link code to add some space between the Newsletter header and the link itself.
- Click the Save button and now you can visit your PrestaShop site and see your Newsletter subscription form link.
Your PrestaShop store is now ready to work with your MailChimp account. You will still create your email campaigns and work with templates from within your MailChimp account. When you're ready to send a campaign, you can do that from either your MailChimp account or within your PrestShop back office.
Comments
|
3 Points
|
2013-02-15 8:25 pm
Hello
i have a problem with this modul i don't all the drop down menu avalaible to chose the the campain etc thanks |
|
Staff 12,339 Points
|
2013-02-15 8:47 pm
Hello chocopc,
Thank you for your question. It sounds like you have not created the new campaign yet. Here is a link to the official mailchimp guide on how to create a new campaign. If you have any further questions, feel free to post them below, or contact live Tech Support. They are available 24/7 via: Email: support@webhostinghub.com Phone: 877-595-4482 x2 & Chat (there is a link on the top right). Thank you, -John-Paul |
|
n/a Points
|
2014-06-27 3:47 pm
Hello I have prestashop 1.5.4.1 After i subscribe the form and fill all the nesessary fields like API mail and html subscription form i wrote to me installed. But there is no form neither on front page nor "in right next to modulles button in your backoffice" as it's written in description. Is there is any solvation? |
|
Staff 12,339 Points
|
2014-06-27 4:09 pm
Hello Natalia,
Thank you for contacting us today. In Step 10 of this guide, it offers several options, which one did you use? Also, did you "create a sign up form in MailChimp and on the Share It tab, copy the code in the HTML Link to Subscribe Form field."  If you have any further questions, feel free to post them below. Thank you, -John-Paul |


We value your feedback!
There is a step or detail missing from the instructions.
The information is incorrect or out-of-date.
It does not resolve the question/problem I have.
new! - Enter your name and email address above and we will post your feedback in the comments on this page!