How to disable a Wordrpess MS site using the Spam setting
Spam is one of the major problems that can occur with WordPress sites, especially when it is used as a blog. Fortunately, the Network Admin allows you immediately deactivate sites and mark them as spam using the Spam Option in the administrator interface. The following article explains how to use the Spam Option in the WordPress MS Network Admin interface.
Using the Spam Setting in a Multi-Site WordPress Installation
- Login to the Network Admin for a WordPress MS Installation.
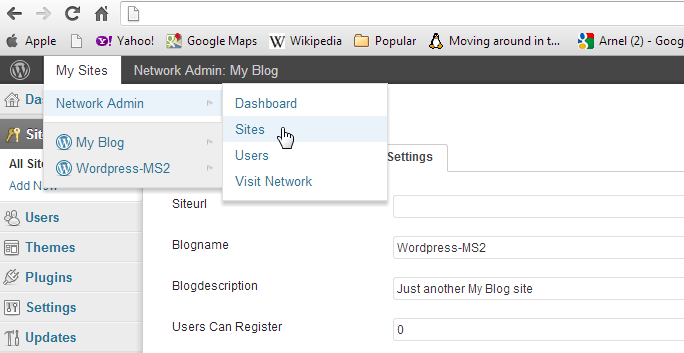
 Hover over the top menu bar where it says My Sites. You will see Network Admin appear in the drop-down menu. Click on SITES in the menu that pops up on the right. When you click on sites, you will see a table listing all of the locations (called Paths) for your networked WordPress sites. Scroll down and then hover the networked WordPress installation that you wish to edit.
 If you wish to review the comments on the site, you will need to go back up to the top menu bar, select the WordPress MS install from the drop-down list and then click on MANAGE COMMENTS.
 Hover over the path for the site that you want to mark as spam and you will see a menu appear beneath that pat for listed WordPress installation. In order to mark the site as SPAM, then click on the SPAM option in the menu.
 You will first see a confirmation screen confirming your choice. Click on CONFIRM to set the choice. Note that SPAM like the other settings (activate and archive) can be reversed at any point.
- Clicking on this option will take the site offline - like the site has been deactivated. The main difference is that it will be marked a darker shade of red and it will only be accessible through the super admin login. You will also see that the word SPAM is applied to the right of the site path. You can also click on checkboxes next to each entry and then use the drop-down menu (labeled "Bulk Actions") to apply a change to multiple sites.
This completes the tutorial for marking a site as spam. If you require more information on WordPress MS options, please go to the WordPress Education Channel for WordPress MS.
Did you find this article helpful?
Tweet
Category
WordPress Network / MS
Help Center Login
WordPress Network / MS
Related Questions
Here are a few questions related to this article that our customers have asked:
Ooops! It looks like there are no questions about this page.
Would you like to ask a question about this page? If so, click the button below!

We value your feedback!
There is a step or detail missing from the instructions.
The information is incorrect or out-of-date.
It does not resolve the question/problem I have.
new! - Enter your name and email address above and we will post your feedback in the comments on this page!