Editing a File with Notepad++
If you do not have access to the Cpanel but you have access to a hosting account with Web Hosting Hub through FTP, then you can use FTP to obtain the file for editing and then re-upload the file when its modification is complete. Notepad++ is freeware and can be directly obtained from the Notepad++ website. We will walk through the steps of using FTP to obtain the file, editing the file with Notepad++, and saving the file back to the server. If you have an account with Web Hosting Hub, then you can find instructions for editing a file using the File manager and its editors here: How to edit a file with the Cpanel Editors.
Using Notepad++ to Modify a File
The first part of being able to modify a file on your website is being able to access it. One of the first solutions to moving files from one location to another was to use FTP (File Transfer Protocol). Using FTP sounds complex, but it is actually a very simple process and there are many free FTP solutions. For more information on the FTP go to: Getting Started Guide: FTP.
- Launch your FTP program and then login into your website. Note that the following steps show how to use Notepad++ with its FTP plugin.
In Notepad++ click on PLUGINS in the menu bar, then hover over where it shows NppFTP. A menu will pop-up to the right and you will see SHOW NppFTP Window. Click on this option in order to see the FTP interface. The latest version of Notepad++ actually contains an FTP program that you can use to directly access and edit your files. It may look like this: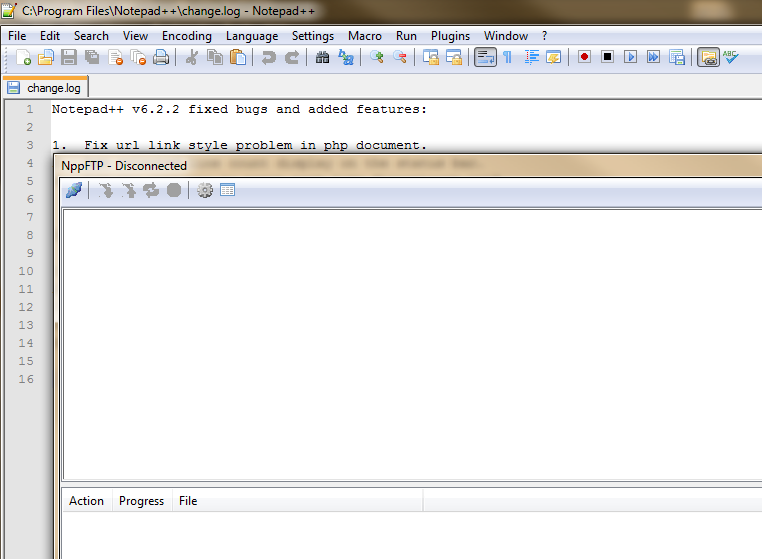
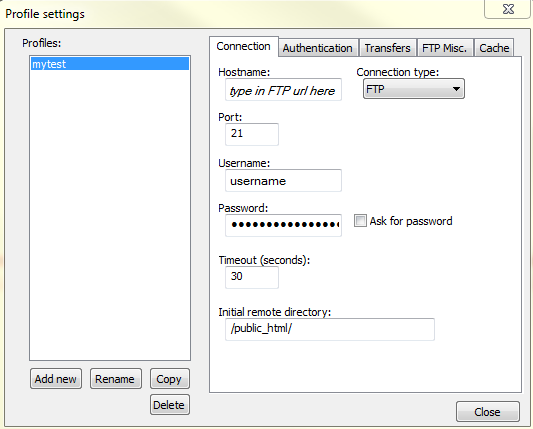
In the NppFTP window click on the gray icon that looks like a gear - it is the second to last icon on the menu bar for the NppFTP window. You will see a menu that shows both General Settings and Profile Settings. Click on PROFILE settings in order to proceed. - Setup your FTP settings (you can find more detail on these settings in the Getting Started Guide: FTP). Click on ADD NEW in order to start the process of creating a new profile. You will need to name the new profile. The CONNECTION tab is typically the only tab for which you need to provide details. The other tabs are only necessary if you have FTP settings needs beyond the basic connection configuration.
- Once you have your settings entered, click on the CLOSE button in the bottom right hand of the PROFILE settings window:
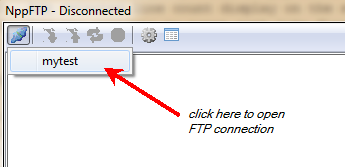
- Next, click on the blue icon in the top left corner of the NppFTP window, then click on the profile that you have created. This is illustrated below:
- When the connection is made you should see a list of your files that have been published to the web server. Here's an example:
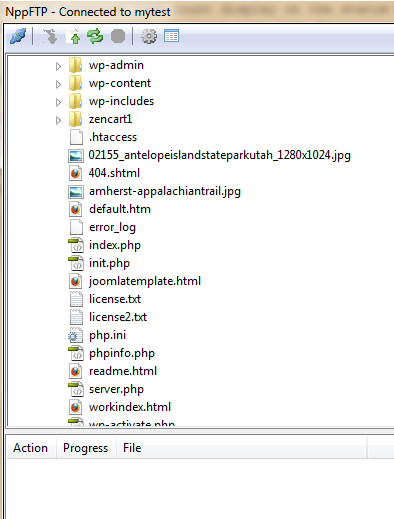
You can double-click (left-click) with your mouse to download a file. This will open the file directly in the Notepad++ interface. Select a file and then double-click on it to download the file. You can also use your mouse and right-click on a specific file. When you right-click on the file, you will have the option to download the file, save the file as another file name (with the option to save in another location), rename the file and delete the file.
Double-click on a file in order to edit the file. It will automatically open the file. - Move the FTP window so that you can edit the file in Notepad++. Make your file changes as necessary.
- Click on the disk icon in the upper left-hand corner to save it immediately, or click on FILE, then SAVE AS and you will see a window similar to the following:
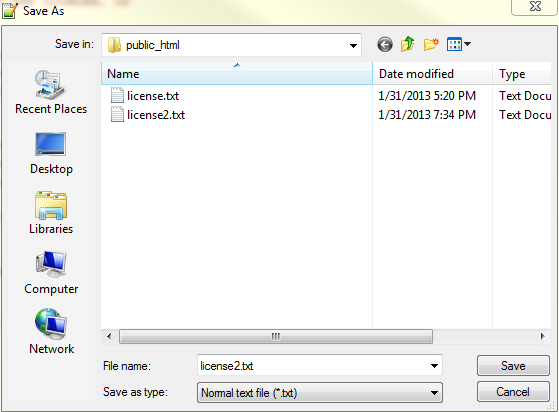
In the screenshot above, I was editing the license.txt file and saving it as license2.txt. The nice thing about Notepad++ is that it automatically re-uploads the file to the website. Note that the directory is set to the "public_html", the same location designated in the FTP settings.
As per the example above, the changes to the file are automatically saved and uploaded to the web server. The Notepad++ solution for editing a file is only one of many options that you can select to accomplish the same thing. You can select your favorite solution, but the basic steps for making the file changes will always be the same. Obtain the file, change the file, and then save the file back to the server.

We value your feedback!
There is a step or detail missing from the instructions.
The information is incorrect or out-of-date.
It does not resolve the question/problem I have.
new! - Enter your name and email address above and we will post your feedback in the comments on this page!