Adding Products to Warehouses in PrestaShop 1.5
Part of managing your inventory will be the process of adding stock. This is the first of several articles that explain the use of the stock management interface to manage products within your warehouse. The following tutorial explains how to add products to a warehouse within PrestaShop 1.5.
Moving Products into Warehouses through PrestaShop 1.5
- Login to the Administrator Dashboard as an Administrator
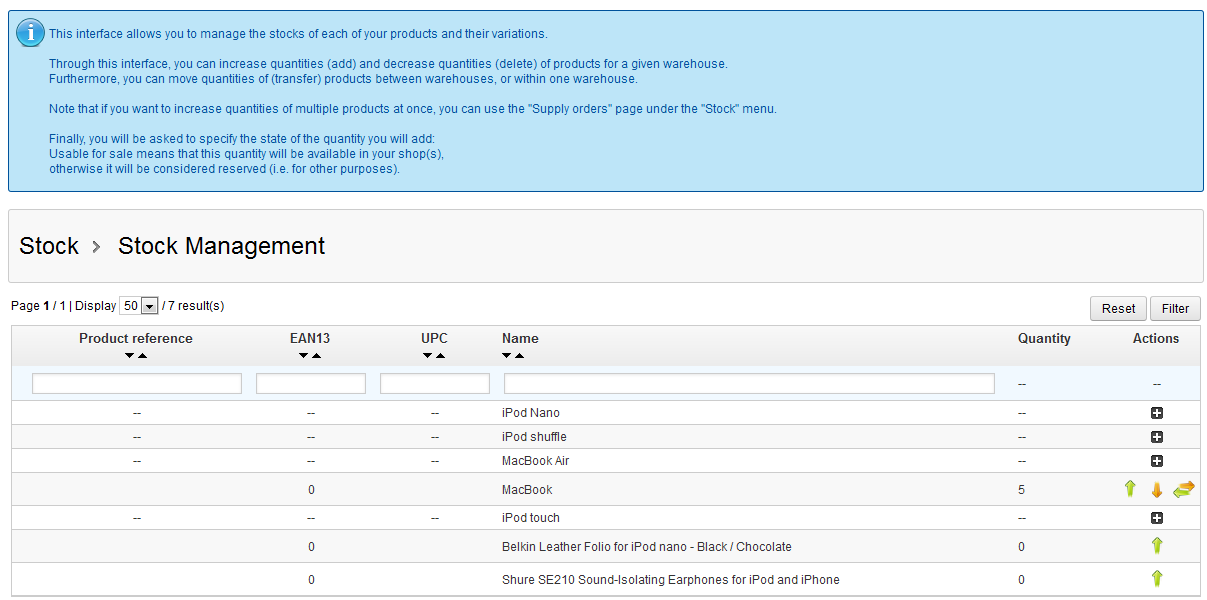
- Hover over the menu bar where it says STOCK. Click on STOCK MANAGEMENT and you will see a screen similar to the following:

DEFINITION OF "STOCK": It is important to consider how PrestaShop manages warehouses because there are a variety of different ways that they can be managed. The two methods covered with Advanced Stock Management in Prestashop are "product quantity available for sale" and "product stocks (physically stored)". The main difference is that the definition of "stock" as determined by PrestaShop 1.4 has changed and is now known as "quantity of product available for sale." This quantity would determine the product's availability. "Stock" is now used in relation to the use of Warehouses where inventory is physically stored.
The information note above the table above instructs you on the functions available to manage your warehouse in this interface. You can add, remove, and transfer stock within this screen. The table columns are defined below:
Product Reference Product reference defined in catalog EAN13 International Article Number UPC Universal Product Code Name Name of product Quantity Number of items in stock Actions
 = Add
= Add  = Remove
  = Transfer
  = Details
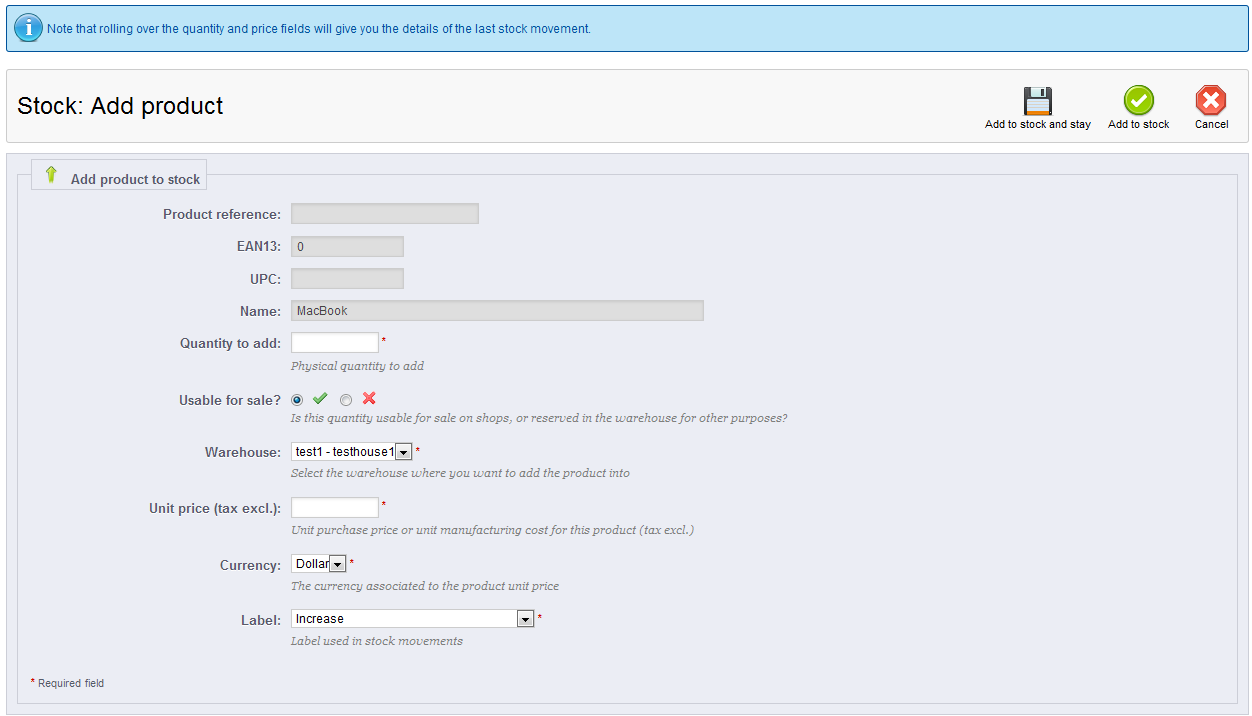
The action buttons all relate to actions done to the stock in the warehouse. Transferring moves the stock from one warehouse to another. Clicking on details would reveal further detail on the stock item in the chart. - Clicking on ADD STOCK (icon pointing up in the actions column) will show the following screen or something similar:

Note that the first 4 fields, which identify the product, are grayed out and cannot be selected. - Hover over the QUANTITY TO ADD field you will may see something such as the following:
 Notice that a blue information field appears showing the
last physical quantity added. And it indicates that the quantity was usable. Meaning that it could be transferred or moved to a shop for the purpose of a sale. - The next option is USABLE FOR SALE? - click on the checkmark in order to indicate that it can be used for sale, or click on the X in order to mark the quantity as reserved in the warehouse.
- The next field is the warehouse to which you are adding the product. Click on the drop down arrow to select the warehouse.
- Select the UNIT PRICE(tax excl) - this is the cost for the item not including the tax
- Determine the currency used for this item's price. Click on the CURRENCY drop-down menu to select the currency you will use.
- LABEL - this to identify the type of stock movement used. Your options will be:
Increase - indicates an overall increase of the stock
Regulation following an inventory of stock - restoration of stock to normal levels
Supply Order - indication of product order from supplier to maintain stock levels - Click on ADD TO STOCK or ADD TO STOCK AND STAY button in the top right hand corner to save your entries.
When adding stock in a warehouse it is important to properly notate the addition so that the stock can be properly added to the inventory. This is important because the stock may not be available for sale or possibly priced differently. These differences are noted so as to properly track your product inventory. Please take the time to properly note your stock when adding it to a wareouse being managed in PrestaShop 1.5. The next management option for your inventory is the removal of stock. Please go to Removing Stock from Warehouses in Prestashop 1.5.

We value your feedback!
There is a step or detail missing from the instructions.
The information is incorrect or out-of-date.
It does not resolve the question/problem I have.
new! - Enter your name and email address above and we will post your feedback in the comments on this page!