How to Add Product Attachments in PrestaShop 1.5
Occasionally, you will get a product that will have a manual or updated driver file that you will want to provide to your customer. Prestashop allows you to share these files using the Attachment option. The following tutorial will show you how to add Attachment files in Prestashop 1.5.
Creating Product Attachment files in PrestaShop 1.5
- Login to the PrestaShop 1.5 Administration Panel as an Administrator
- Go to the menu bar and hover over CATALOG until the drop-down menu appears. Click on PRODUCTS
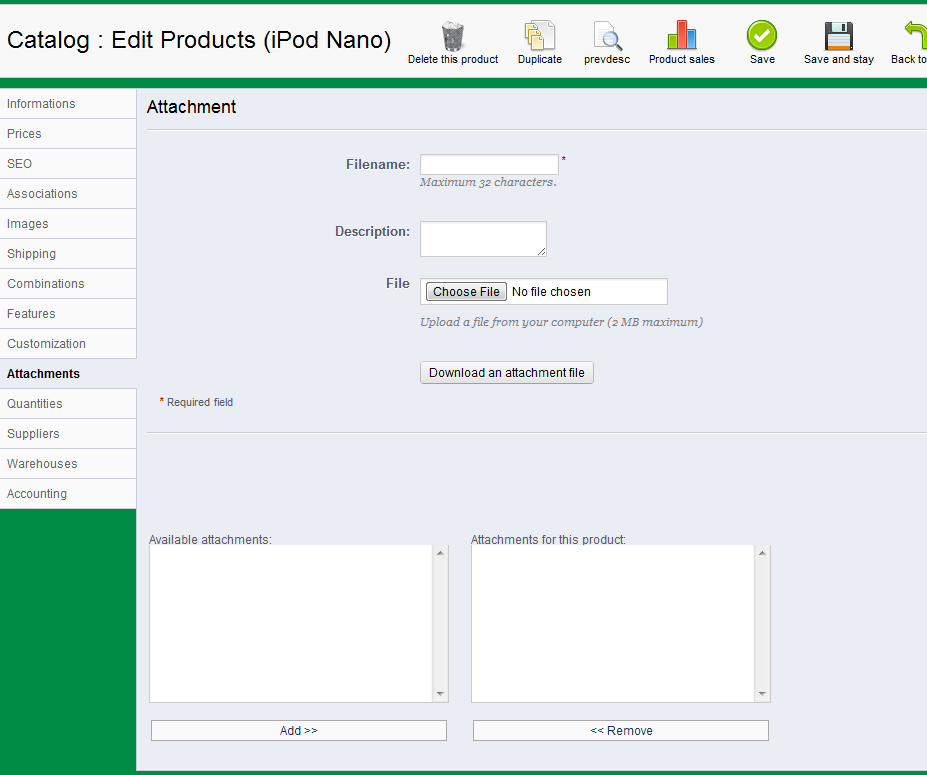
- If you are managing an existing inventory, you will see a list of your products. Select one of your products and then click on EDIT. Otherwise, select ADD NEW from the top right hand side of the screen. Once you have either selected a product or created a new one, you will see a menu strip on the lefthand side. Select ATTACHMENTS and you will see the following screen:

Fill in the file name (which is required) and a description of the file, then select DOWNLOAD AN ATTACHMENT FILE in order to download the file to Prestashop. - As the file is downloaded, you will see it listed one of the two boxes at the bottom of the screen: AVAILABLE ATTACHMENTS and ATTACHMENTS FOR THIS PRODUCT. In order to make the file available for the product, click on the ADD button at the bottom. If you need to remove an file from the list on the right, then select the file you wish to remove and select REMOVE
- Select SAVE at the top right hand corner of the screen in order to save your entries.
The result of this change is that the customer will be able to select the file for download. Here's a screenshot of this option in the product:
When the file is available, the option will be available for download in the tab as per above.
Did you find this article helpful?
Tweet
Help Center Login
Working with Products in PrestaShop 1.5
Related Questions
Here are a few questions related to this article that our customers have asked:
Ooops! It looks like there are no questions about this page.
Would you like to ask a question about this page? If so, click the button below!

We value your feedback!
There is a step or detail missing from the instructions.
The information is incorrect or out-of-date.
It does not resolve the question/problem I have.
new! - Enter your name and email address above and we will post your feedback in the comments on this page!