Preventing access to specific file types in .htaccess
Your website may contain many different types of files. Some are obvious, such as html and php files, but there are also image files (jpg, gif, png) and initialization files (ini) files. If you do not take measures to prevent direct access, a visitor can simply type the path of the file and view it. For example, if there are two files named start.ini and config.ini that house configuration settings, a person can type example.com/start.ini or example.com/config.ini in their browser and view the text of the files.
This may not be a big deal for image files, but viewing log files and ini files can be dangerous. Preventing access to the .ini file type in the .htaccess file will simply give them an access denied error when trying to view the files. Follow the steps below to prevent access to specific file types via your .htaccess file.
How to prevent access to certain file types using .htaccess
- Log into your cPanel dashboard.
- Locate the Files category on the right-hand panel. From there click on the File Manager icon.

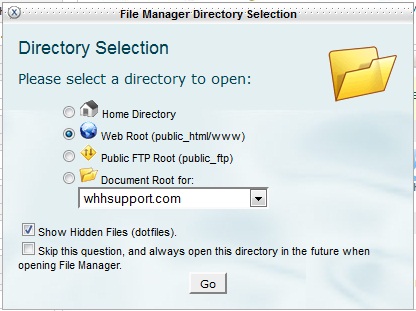
- A popupbox will appear for you to choose which directory you want to begin in. For the primary domain, simply click on the Web Root radio button. For addon or subdomains, click on the radio button next to the dropdown labeled Document Root for: and choose the desired option. Ensure the checkbox next to Show Hidden Files (dotfiles) is checked as the .htaccess is a hidden file. Click on the Go button to continue.

- This leads you to your chosen folder. From here, look through the right-hand panel to find your .htaccess file. Click on the file name to highlight the file and then click on the Edit icon found in the toolbar across the top of the page.

- Youare now in the .htaccess file editor where you will insert the code. Copy and paste the code below into the .htaccess file at the top. You will notice the first line contains a list of common file types (htaccess, htpasswd, ini, psd, log, sh). Feel free to add additional file types or remove any you do not want to block. Be sure to use | in between file types to separate them.
<FilesMatch "\.(htaccess|htpasswd|ini|psd|log|sh)$">
Order Allow,Deny
Deny from all
</FilesMatch> - Once you have inserted the code and edited it for the file types you wish to block, click on the Save Changes button to activate the new code. Below is a before and after sample of a file named start.ini and how it would display with the code inserted.
Before After 


We value your feedback!
There is a step or detail missing from the instructions.
The information is incorrect or out-of-date.
It does not resolve the question/problem I have.
new! - Enter your name and email address above and we will post your feedback in the comments on this page!