Forcing the non-www or www version of your site with htaccess
When typing in a website name in the web browser, some visitors use the www in front of the domain name (www.example.com) and some do not (example.com). Though this results in the same site being displayed there is some thought that using only one version is better for search engine optimization. This tutorial demonstrates how to force your site to use either version by making a change in the .htaccess file.
Force www or non-www via .htaccess
- Log into your cPanel dashboard
- Locate the Files category and click on the File Manager tool icon.

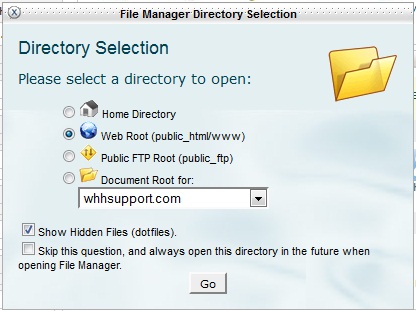
- A popup box will appear asking in which directory you want to begin. For the primary domain, simply click the radio button labeled Web Root. If you are working with an addon domain, you can select the appropriate document root from the Document Root for: dropdown. Once you select your desired directory, click on the Go button to enter.

- You are now in the root folder for the domain you are working with. Locate the .htaccess file and highlight it. Click on the Edit button from the toolbar at the top of the page. This will bring up a popup. Click on the Edit button at the bottom to continue to the editor.
- This is the file editor for the .htaccess file. You will want to place the code at the top of the page. You can copy and paste the code below into the editor. Choose the appropriate code depending on whether you want to force www or non-www on your webpage. In the sample code, be sure to replace the example.com domain with your own domain name.
Do not place both sections of code in the .htaccess file. This will cause an error and your website will not display.
#Force www:
rewriteEngine on
RewriteCond %{HTTP_HOST} ^example.com [NC]
RewriteRule ^(.*)$ http://www.example.com/$1 [L,R=301,NC]
#Force non-www:
RewriteEngine on
RewriteCond %{HTTP_HOST} ^www\.example\.com [NC]
RewriteRule ^(.*)$ >http://example.com/$1 [L,R=301] - Once you insert the code, click on the Save Changes button in the upper right corner to save the code change. You can now type your domain name either with or without the www and it will display in the address bar in the format you have set the code for.
Did you find this article helpful?
Tweet
Category
General Server Setup / Management
Help Center Login
Related Questions
Here are a few questions related to this article that our customers have asked:
Ooops! It looks like there are no questions about this page.
Would you like to ask a question about this page? If so, click the button below!

We value your feedback!
There is a step or detail missing from the instructions.
The information is incorrect or out-of-date.
It does not resolve the question/problem I have.
new! - Enter your name and email address above and we will post your feedback in the comments on this page!