Changing the Background Image in OpenCart 1.5
You will occasionally have the need to change the background scenery of your OpenCart installation so that it looks the way you want it to look. This modification is accomplished by modifying the existing theme's STYLESHEET.CSS (Cascading Style Sheet) file. The addition of a background image will affect multiple elements of the website including colors, font colors and other graphics that must appear on top of the image. However, the rewards of making a good image change include keeping your site fresh for your users and also standing apart from your competition. The following tutorial shows you how to modify the background image in the default theme of the OpenCart 1.5 installation.
Modifying the Background Image in OpenCart 1.5
To give you an idea of the background that is being changed in OpenCart let's view a few screenshots so that there is an understanding of what will be changed by the instructions in this article: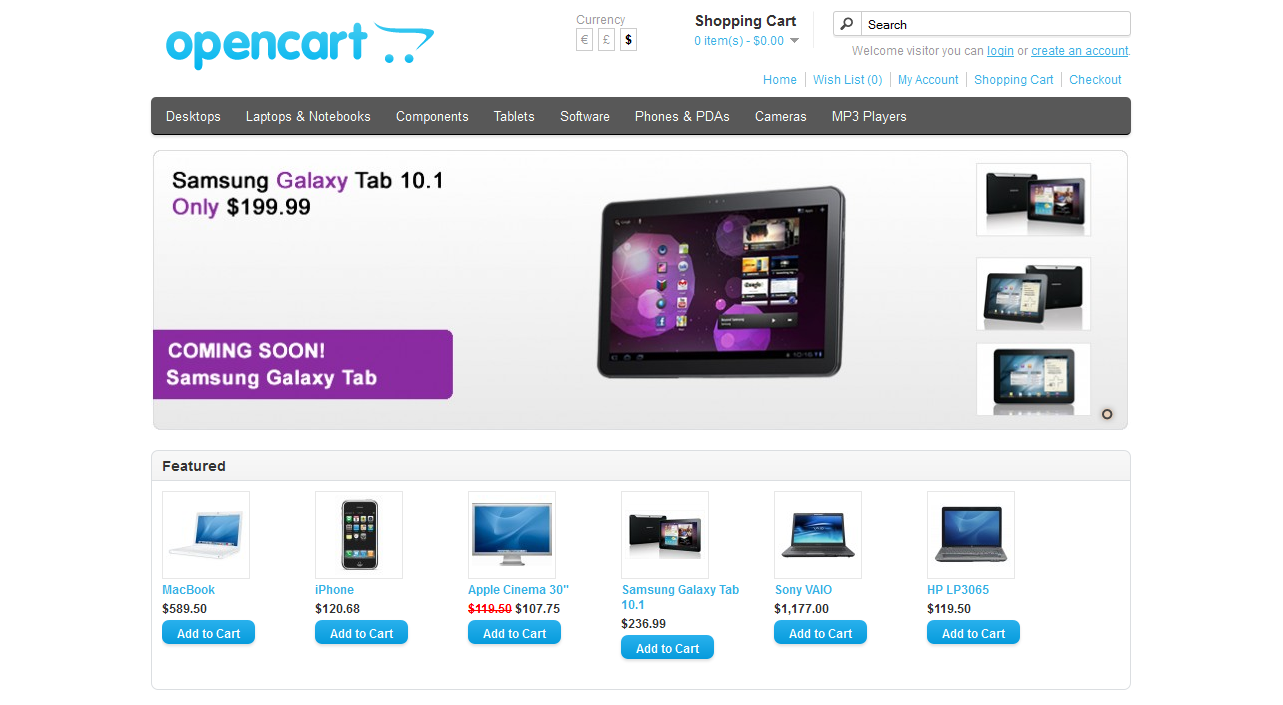
The image above shows the default theme using sample data with an OpenCart installation. The image below shows a change in the color of the background:
Note that in the above image, the background color has been changed to black. You can also add an image to the background, here's an example of how it would look with modifications to the CSS file for centering and expanding an image: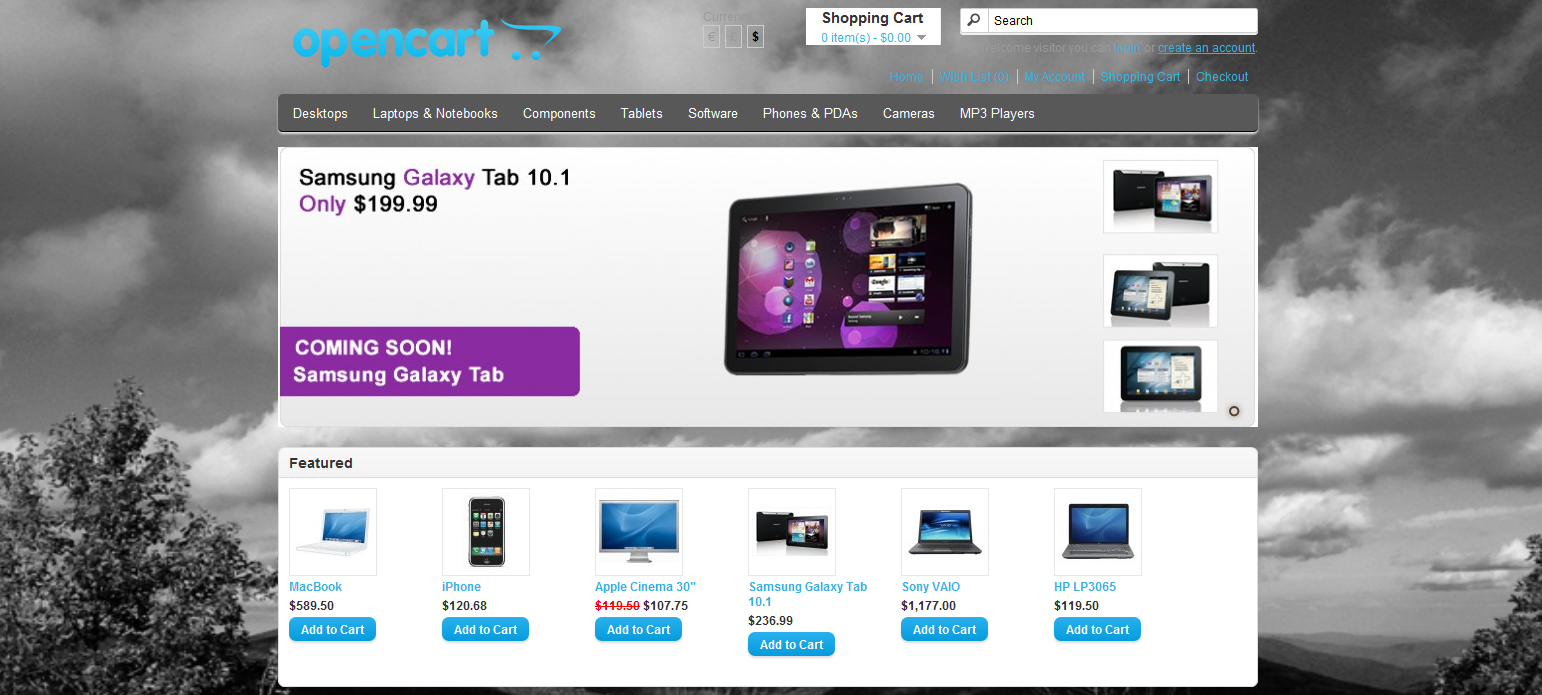
In order to make these changes you will need to have access to the installation folder for OpenCart, and then be able to edit the stylesheet CSS file for the theme that is loaded. The CSS file is a text file that is found within the installation files for OpenCart. The following instructions will reference the Cpanel File Manager and the built-in editors for these tasks. Knowledge of basic CSS commands will also help, but for this article we will provide the commands you need in order to make the appropriate changes to the file.
Editing Stylesheet.CSS file in the OpenCart Installation
- Login to your Cpanel and then click on File Manager to open the application.
- The path for the Stylesheet.CSS file that you are seeking will in a path similar to the following:
/public_html/catalog/view/theme/default/stylesheet.css
If you installed OpenCart to a directory other than the primary domain, then path would look something like this:
/public_html/DOMAINNAME/catalog/view/theme/default/stylesheet.css
DOMAINNAME = the name of your add-on domain or subdomain
Note that the DEFAULT part of the path is the folder for the DEFAULT theme. If you are using a different theme, then you will need to identify it and choose the appropriate path (e.g. /public_html/domainname/catalog/view/newtheme/stylesheet.css)
Use the File Manager to go to this path. You can click on the field in the top left corner (with the button labeled GO next to it). Type in the path then click GO, or you can click on the folders listed in order to find the correct folder where the stylesheet.css is located. Here's a quick screenshot of how the File Manager will appear: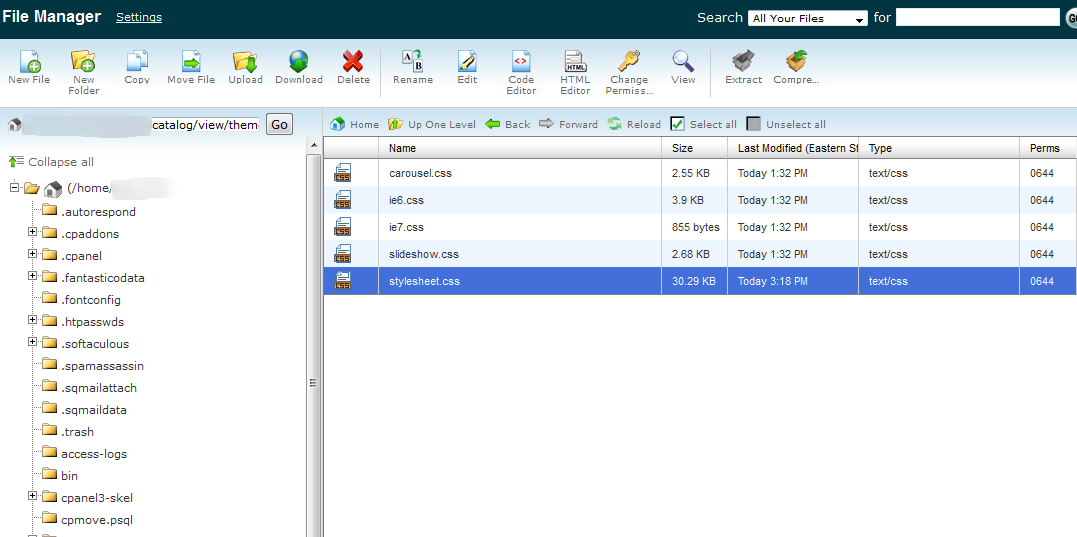
Note that the paths above are blurred to protect the account security for example shown above. Additionally, clicking on the folders in the left-hand column will change the content in the right-hand window. You can only EDIT the content in the right-hand window of the file manager. Therefore, please click on the file in the right-hand window when making any file changes. - Backup the file by making a quick copy. To this, do the following:
a) Click on the file STYLESHEET.CSS file to highlight it
b) Click on COPY at the left side of the menu bar of the File Manager
c) The default path at the bottom of the COPY window that will appear is the path for the current location of the file. You will need to add a file name of the backup file by clicking at the end of the file path and then type (with no quotes) "/stylesheet-backup.txt" or whatever you wish to name the file. If you don't rename the file, you will get an error message stating, "File OP Failure...Source and Destination are the same". This simply means that the action can not be completed because the filename is identical. Change the file name and you will create a backup file in the same path with that new file name. This gives you insurance in case you make mistakes in the original file and need to recover the file as it was before you made any changes. - Once you have located the STYLESHEET.CSS file, click on it to highlight it, then in the upper menu bar of the file manager, click on EDIT in order to edit the file. You can also choose to use CODE EDIT as an option. CODE EDIT will show the CSS code in number lines with specific spacing format. Using the plain EDIT will not do this. Additionally, when clicking on CODE EDIT or EDIT, you may see an additional window asking you to backup the original file before converting the character sets. You should always do this before making any changes to your files. If you didn't make a backup as per the instructions in Step 3, then please take a moment to backup the file so that you can recover from any possible mistakes to the STYLESHEET.CSS file. Click on EDIT to continue with the editing process, or click on CANCEL to stop and return to step 3.
- When editing the file you will see something similar to the following (using the CODE EDIT option):
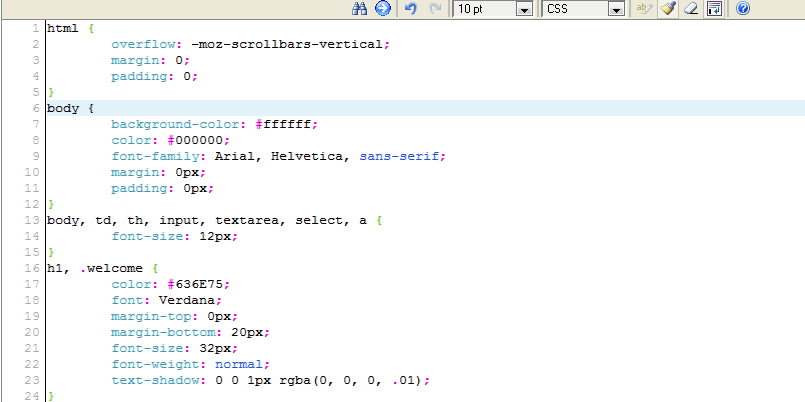
Look for the BODY of the CSS file (as highlighted in the screenshot above). If you are familiar with CSS (Cascading Style Sheet), the STYLESHEET.CSS is key to modifying how certain parts of your website will appear - this includes, fonts, color, formatting, etc. As per the example screenshots at the top of this article, the BACKGROUND-COLOR was modified from #ffffff (the color white) to #000000 (the color black). With the background set to the color black, the CSS entry for background-color would appear as:
background-color: #000000;
In order to add an image to the background, you will need to add a different line of code. This change will involve modifying the STYLESHEET.CSS file by adding several lines of code. Note that this code includes basic CSS commands and are but a small portion of the CSS commands that you can utiliize in this file. - You will also need to save your image file to the server. Make sure that your image is the appropriate format and size to accommodate your customers. I would suggest using either JPEG, GIF, or PNG file formats. Remember that large background images will affect the load time of your website, so keep the file size (in terms of bytes) to something as small as possible. Here's an example of how you can save your image file with the FILE MANAGER:
Go to the following path: /public_html/catalog/view/theme/default/image (note: this is with DEFAULT as the theme in use and the site installed in the primary domain)
You will see a number of image files listed in the folder already. At the top of the FILE MANAGER, click on UPLOAD and then find the image file you want to use on your computer by selecting BROWSE. Once you have found it, click on the OPEN button, and the file will automatically be uploaded into the IMAGE folder. Remember to take note of the file name that you will use. - Returning to the EDITOR viewing the STYLESHEET.CSS file, put your cursor at the beginning of line #7 - which indicates the background-color by left-clicking at the beginning of the line with your mouse. Click on the ENTER key of your keyboard in order to create a line space then type in the following:
background-image: url('../catalog/view/theme/default/image/background-bw-2.png
background-repeat: no-repeat;
background-color: #000000;
The following table explains the commands used above:
background-image path of the image file to be displayed background-repeat indicates if image file is being tiled or not - "no-repeat" indicates no tiling background-position determines the position of the graphic file being displayed background-size determines how large the image will be displayed relative to the site; 100% indicates that it will be occupy all of the background space behind the website background-color determines the color used in the background of the website - Click on SAVE CHANGES in the top right-hand corner of the editor in order to save your modifications.
Make sure to review your changes and take a close look at the entire store website with your image in place. It's possible that you may need to adjust the image in a graphics editor so that you have no problems with viewing certain pages. Font colors can also be adjusted in the STYLESHEET.CSS, but it may be simpler to edit your image or its position.
Changing the image background in OpenCart is one of the key changes you can make that will re-define how your site appears to your customers. It involves making sure that the image is correctly positioned using CSS commands and then insuring that the text and other elements of the site are visible per the theme that you are using. Image changes are important to keep your site fresh and can be the edge you need to make your site standout from your competition.
Comments

23 Points
|
2015-10-26 2:31 pm
There are slight changes in OpenCart 2 & 3. But the articles is bang on target.
|

We value your feedback!
There is a step or detail missing from the instructions.
The information is incorrect or out-of-date.
It does not resolve the question/problem I have.
new! - Enter your name and email address above and we will post your feedback in the comments on this page!