Protecting Your Wordpress Site with the BulletProof Security Plugin
When you are designing a website using Wordpress, there are many security related plugins, one of the most popular is BulletProof Security. In this tutorial we will show you how to install the BulletProof Security Plugin in Wordpress, then activate the Bulletproof Modes.
This will help protect your website from some of the most common cyber attacks.
Here is a link to the official plugin page for BulletProof Security.
Install the BulletProof Security Plugin:
- Login to the Wordpress Dashboard.
- Click the Plugins link on the menu bar, then click the Add New link.

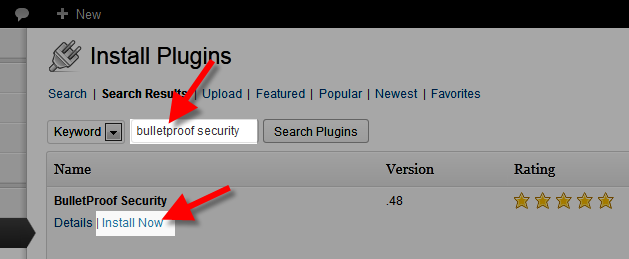
- In the available box, search for 'bulletproof security'. You will see it listed, click the Install Now link.

- A box will pop-up and ask "Are you sure you want to install this plugin?" click the OK button.
- You will then see an Installing Plugin page, click the Activate Plugin link. You have now successfully installed the BulletProof Security Plugin in Wordpress.
BulletProof Security Settings:
Now that you have successfully installed the Bulletproof Security Plugin, you can go through the settings. I recommend performing a site backup before working with the settings.
- Click the BPS Security link in the navigation menu.
- Click the Create secure.htaccess File button. A message will pop-up explaining what this will do, click the OK button.
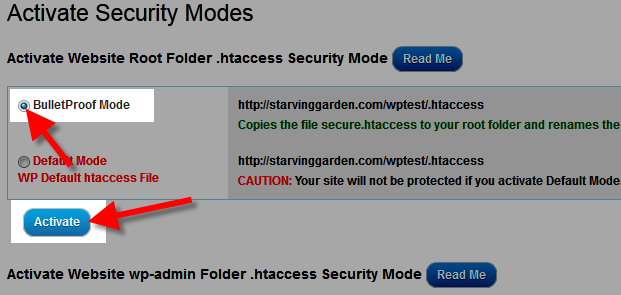
- Under the "Activate Website Root Folder .htaccess Security Mode" section, click the BulletProof Mode option, then the Activate button.

A message will pop up stating "Did you create your Master .htaccess files using the AutoMagic buttons? Did you backup your existing .htaccess files? Do you have any custom .htaccess code in your Root .htaccess file that you want to save before Activating BulletProof Mode? Clicking OK will overwrite your existing Root .htaccess file. Click OK to Activate BulletProof Mode for your Root folder or click Cancel." Click the OK button. - Under the next section titled "Activate Website wp-admin Folder .htaccess Security Mode" Click the BulletProof Mode option, then click the Activate button below.
- Now, click the BulletProof Mode option under the heading titled "Activate Deny All htaccess Folder Protection For The BPS Master htaccess Folder," then click the Activate button.
- Lastly, under "Activate Deny All htaccess Folder Protection For The BPS Backup Folder" click the BulletProof Mode option, and the Activate button.
You have now successfully activated the BulletProof Security modes.
Congratulations, now you know how to install and activate the BulletProof Security Plugin in Wordpress!
Did you find this article helpful?
Tweet
Category
Wordpress Security
Help Center Login
Wordpress Security
Related Questions
Here are a few questions related to this article that our customers have asked:
Ooops! It looks like there are no questions about this page.
Would you like to ask a question about this page? If so, click the button below!

We value your feedback!
There is a step or detail missing from the instructions.
The information is incorrect or out-of-date.
It does not resolve the question/problem I have.
new! - Enter your name and email address above and we will post your feedback in the comments on this page!