Using the Sucuri Security - SiteCheck Malware Scanner Wordpress Plugin
There are many Plugins available for protecting your Wordpress powered website, one of the highest rated ones is Sucuri Security - SiteCheck Malware Scanner. In this tutorial we will show you how to install the Sucuri Security - SiteCheck Malware Scanner plugin in Wordpress, then we will go over the basic settings.
I recommend performing a backup of your website, before installing a Wordpress plugin.
Install Sucuri Security - SiteCheck Malware Scanner:
- Login to the Wordpress Dashboard.
- Click the Plugins link in the navigation menu, then click the Add New link.
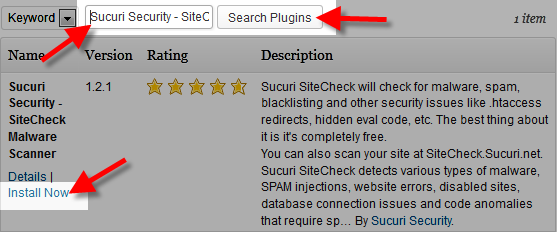
- In the search box, enter "Sucuri Security - SiteCheck Malware Scanner" then click the Search Plugins button.
- You will see Sucuri Security - SiteCheck Malware Scanner listed, click the Install Now link.

A message will pop-up asking "Are you sure you want to install this plugin?" click the OK button. - The "Installing Plugin" message will come up, click the Activate Plugin link. Sucuri Security - SiteCheck Malware Scanner has now been successfully installed.
Using Sucuri Security - SiteCheck Malware Scanner:
- You can access the plugin by clicking the Sucuri Free link in the Wordpress Dashboard.
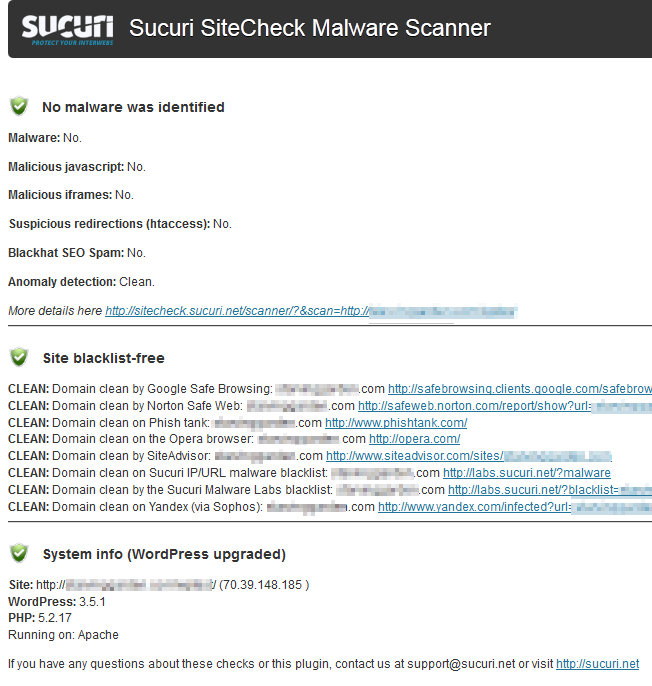
- Now, click the Scan this site now! button. After a moment you will see a scan result, here is an example of what it will look like:

Congratulations, now you know how to install and perform a scan using the Sucuri Security - SiteCheck Malware Scanner plugin for Wordpress.
Did you find this article helpful?
Tweet
Category
Wordpress Security
Help Center Login
Wordpress Security
Related Questions
Here are a few questions related to this article that our customers have asked:
Ooops! It looks like there are no questions about this page.
Would you like to ask a question about this page? If so, click the button below!

We value your feedback!
There is a step or detail missing from the instructions.
The information is incorrect or out-of-date.
It does not resolve the question/problem I have.
new! - Enter your name and email address above and we will post your feedback in the comments on this page!