Using the File Inspection Plugin to Protect Your Wordpress Site
There are many Plugins available for protecting your Wordpress powered website, one of the highest rated ones is File Inspection. With the File Inspection plugin you can check your files, and if a hack occurs you can see what files were modified, so they can be easily located and fixed.
In this tutorial we will show you how to install the File Inspection plugin in Wordpress, then we will show you how to use the plugin to identify files that have been created or changed after hack.
I recommend performing a backup of your website, before installing a Wordpress plugin.
Install File Inspection:
- Login to the Wordpress Dashboard.
- Click the Plugins link in the navigation menu, then click the Add New link.
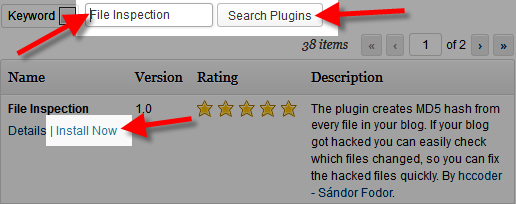
- In the search box, enter "file inspection" then click the Search Plugins button.
- You will see File Inspection listed, click the Install Now link.

A message will pop-up asking "Are you sure you want to install this plugin?" click the OK button. - The "Installing Plugin" message will come up, click the Activate Plugin link. File Inspection has now been successfully installed.
Using the File Inspection Plugin:
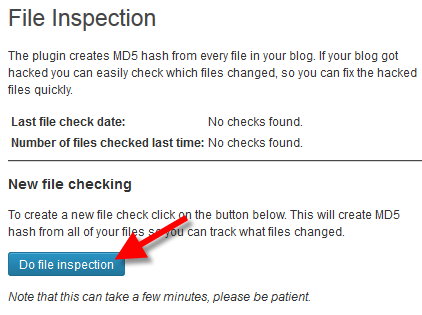
- Access this plugin by clicking the File Inspection link in the Dashboard.
- The first time you access the File Inspection plugin, click the Do file inspection button.

- After you work in the Dashboard, I recommend performing a file inspection again.
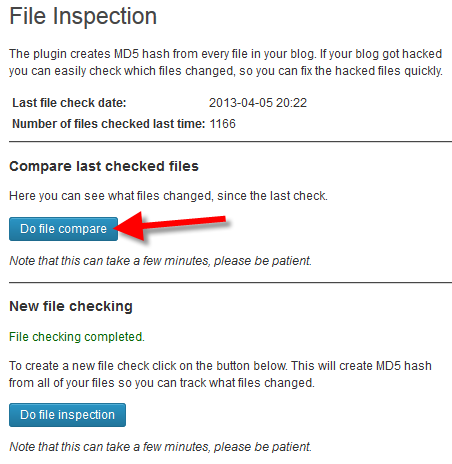
- If you suspect your site was hacked, click the Do file compare button, and your files will be scanned for any new or modified files.

In my tests nothing was changed, here is an example of the results:
Congratulations, now you know how to use the File Inspection plugin to identify files that have been created or modified after a hack!
Did you find this article helpful?
Tweet
Category
Wordpress Security
Help Center Login
Wordpress Security
Related Questions
Here are a few questions related to this article that our customers have asked:
Ooops! It looks like there are no questions about this page.
Would you like to ask a question about this page? If so, click the button below!

We value your feedback!
There is a step or detail missing from the instructions.
The information is incorrect or out-of-date.
It does not resolve the question/problem I have.
new! - Enter your name and email address above and we will post your feedback in the comments on this page!